Feeds:
Posts
Comments

Archive for the ‘dyeing’ Category

Serendipity

Three weeks ago I went over to the west side of the mountains for a 2-day workshop through the Seattle Weavers’ Guild.  It was taught by Kris Abshire, a weaver, dyer and surface design artist who lived and worked in Alaska for most of her life, but now lives in western Washington.  This particular workshop is called “Serendipity in a Cup” and focuses on hand-painting warps and wefts for weaving.

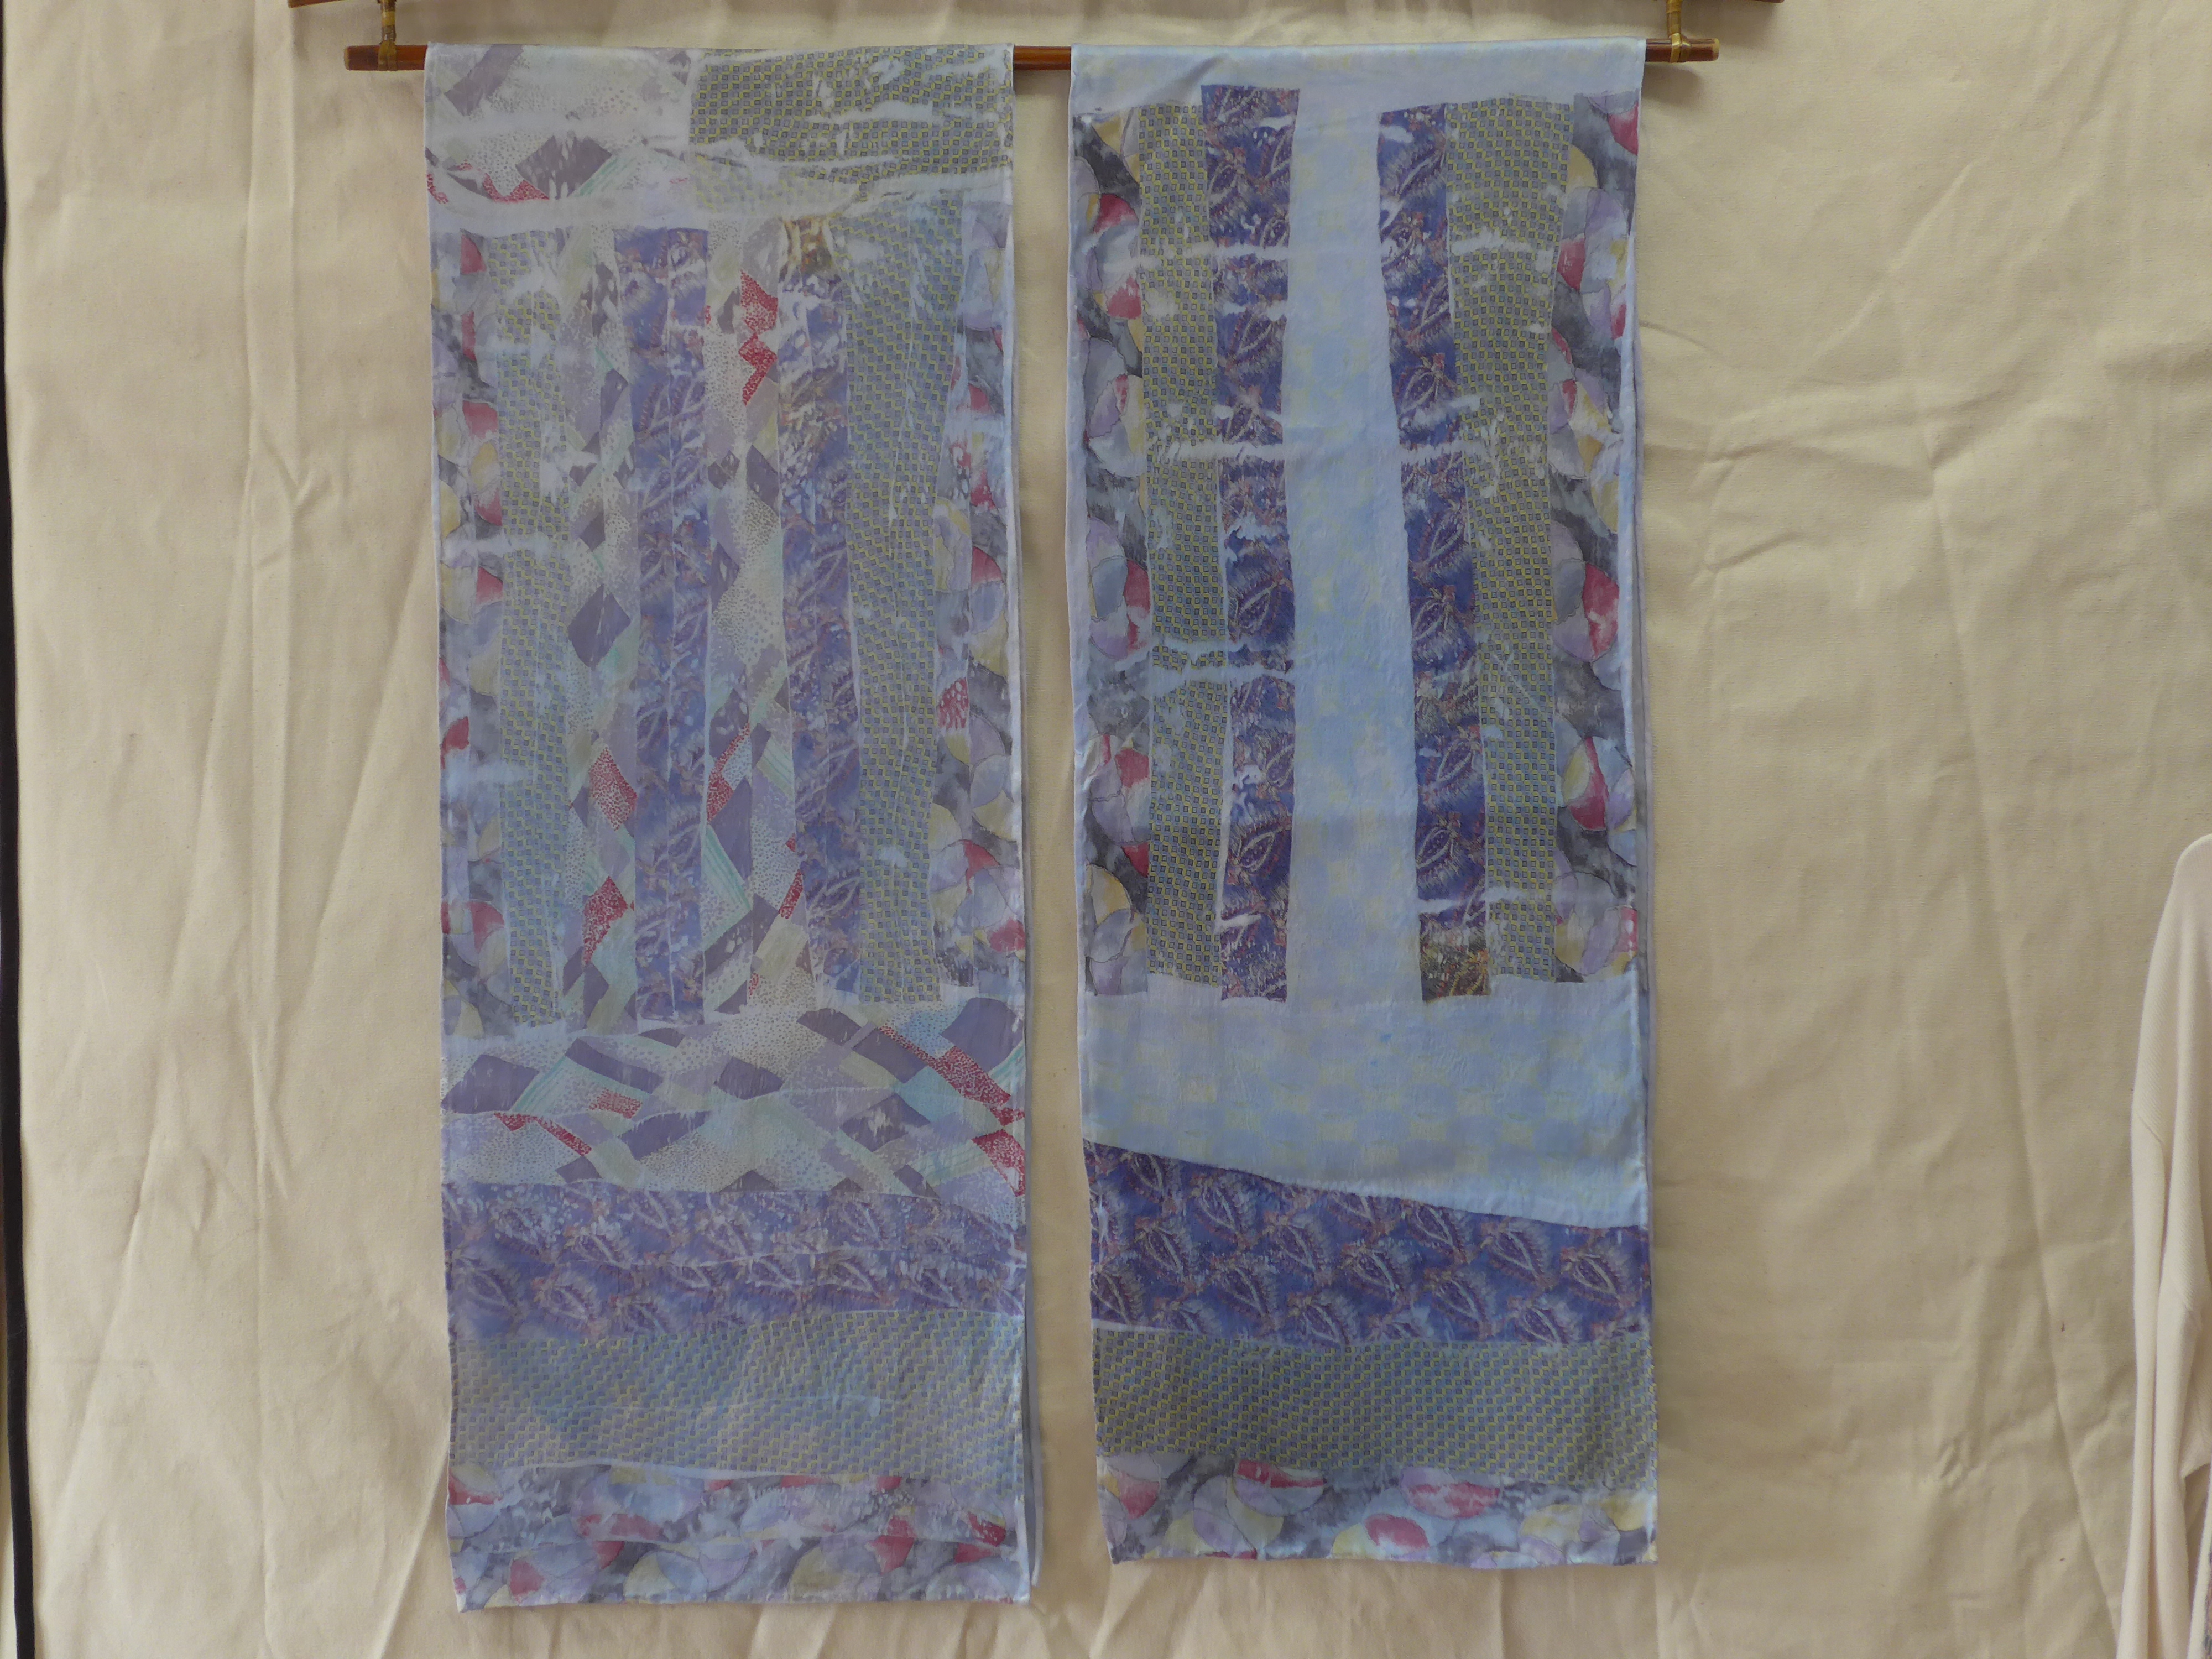
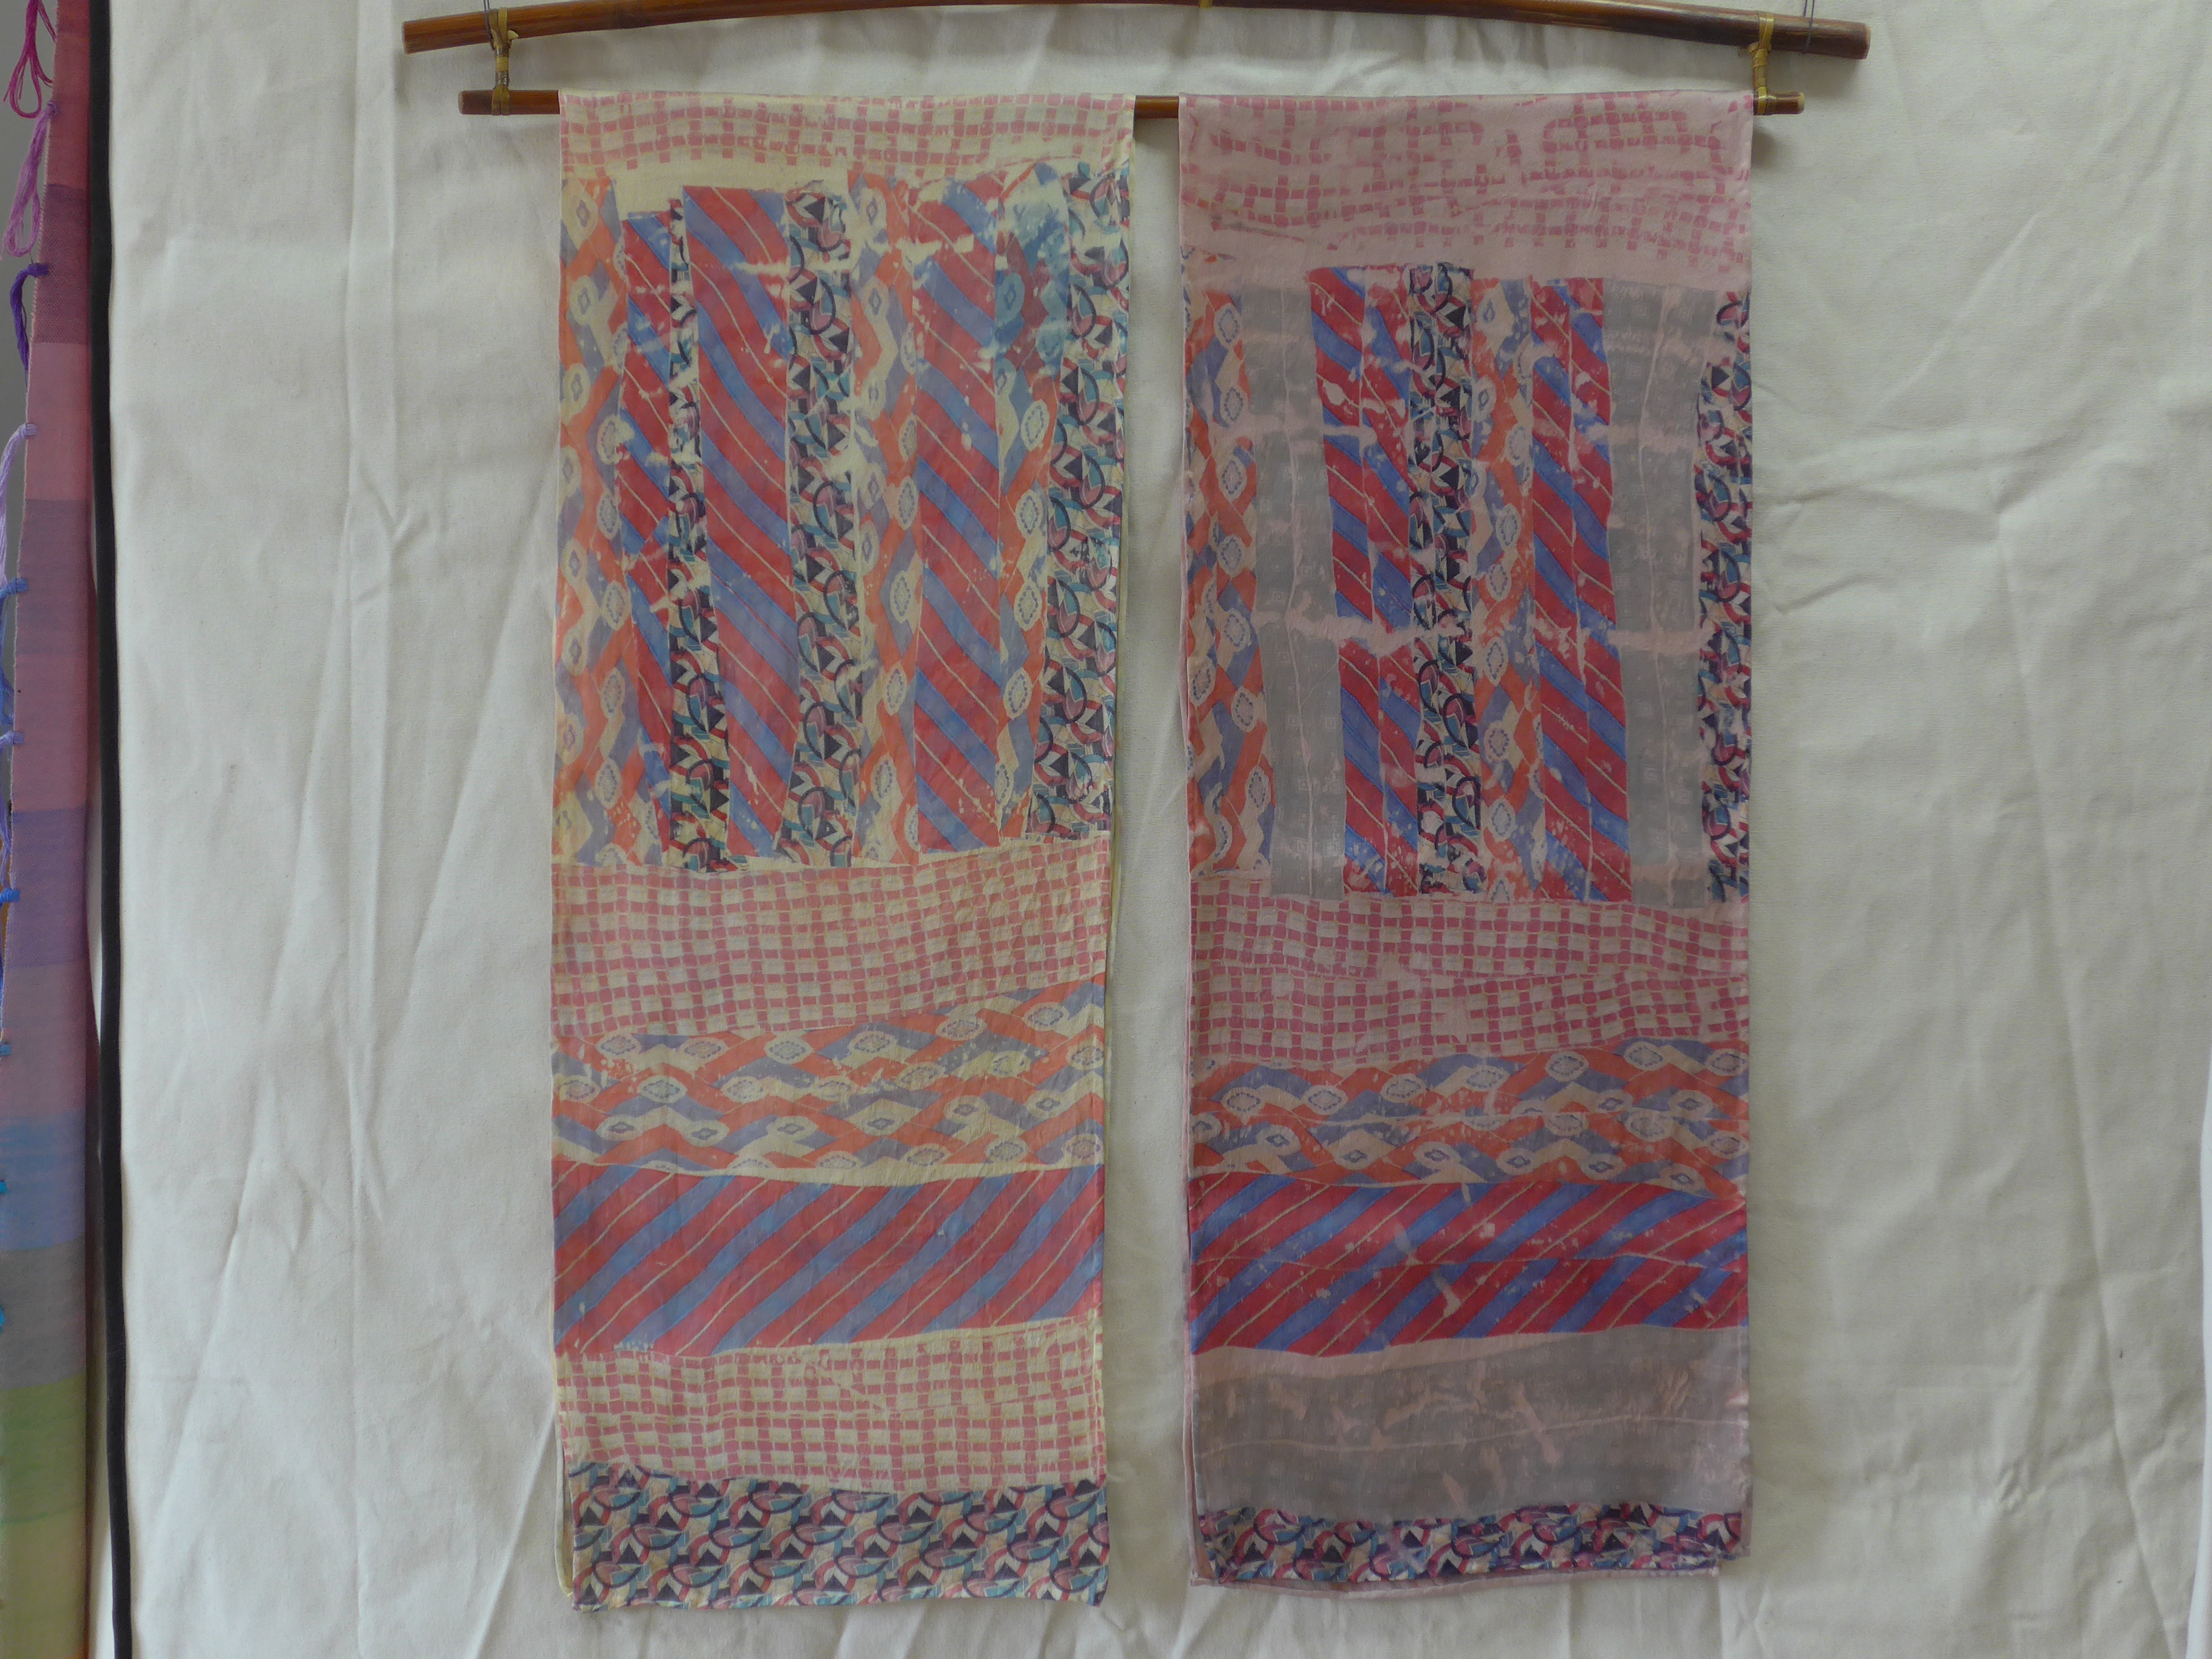
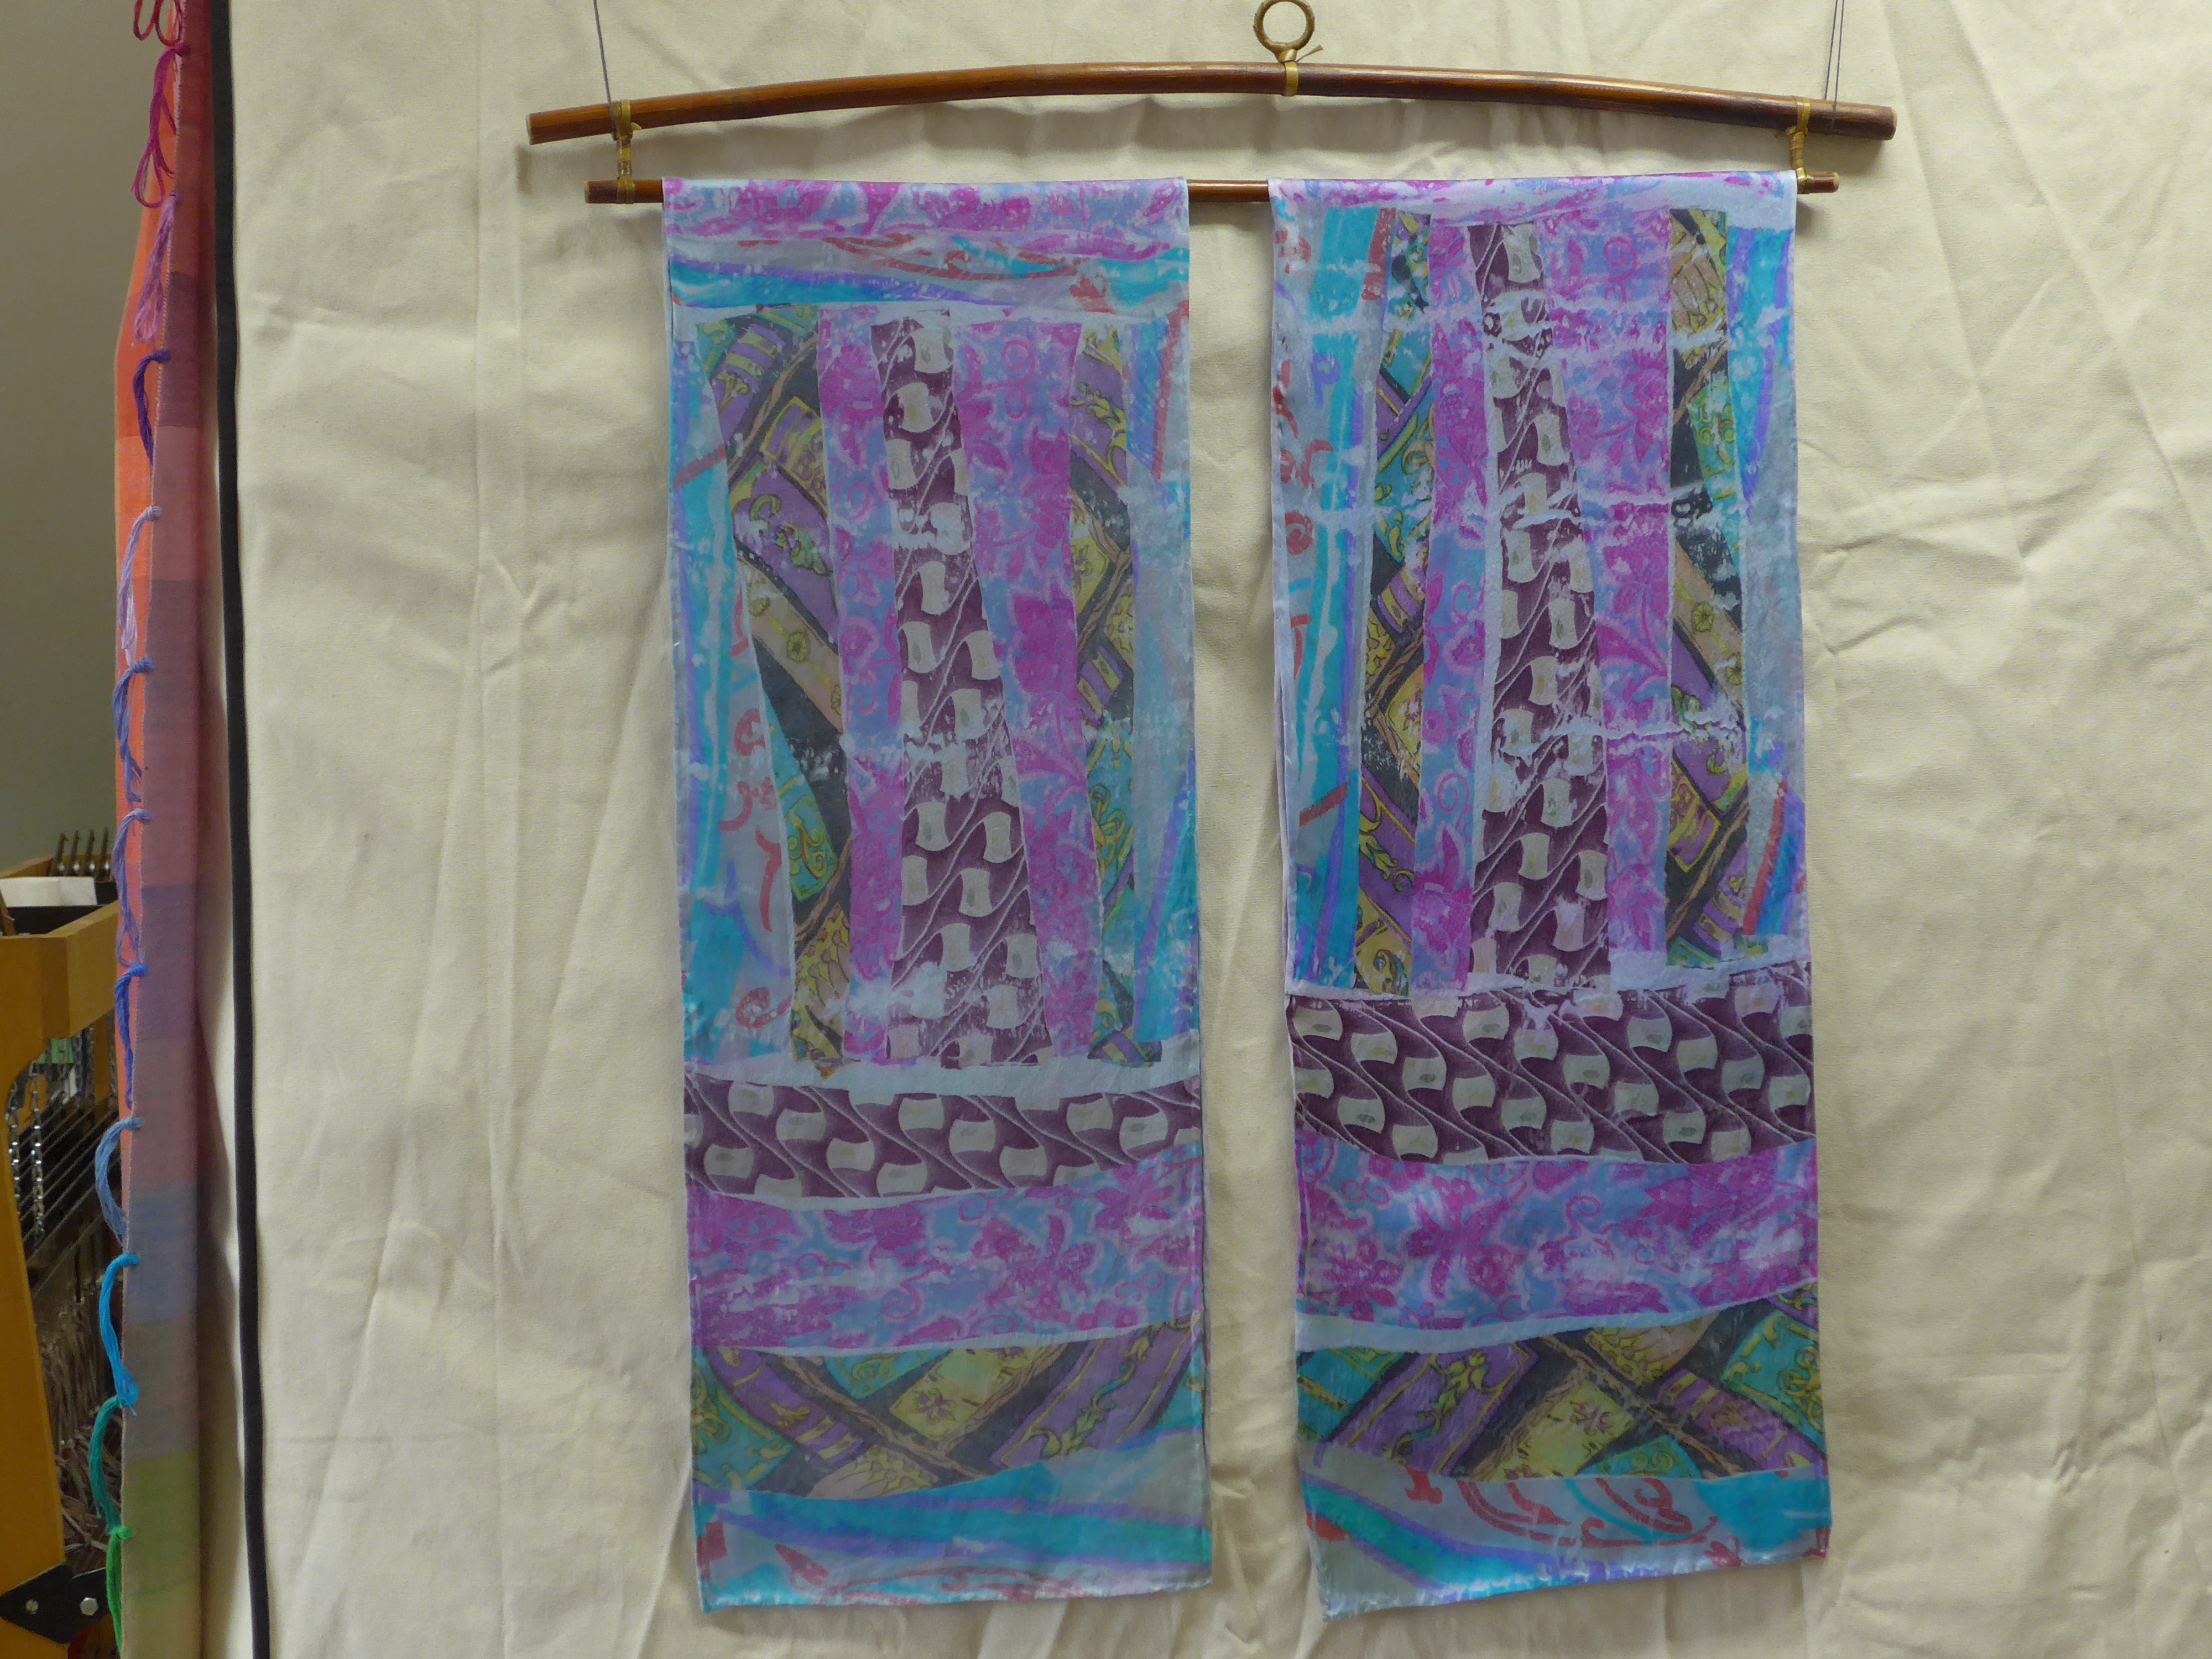
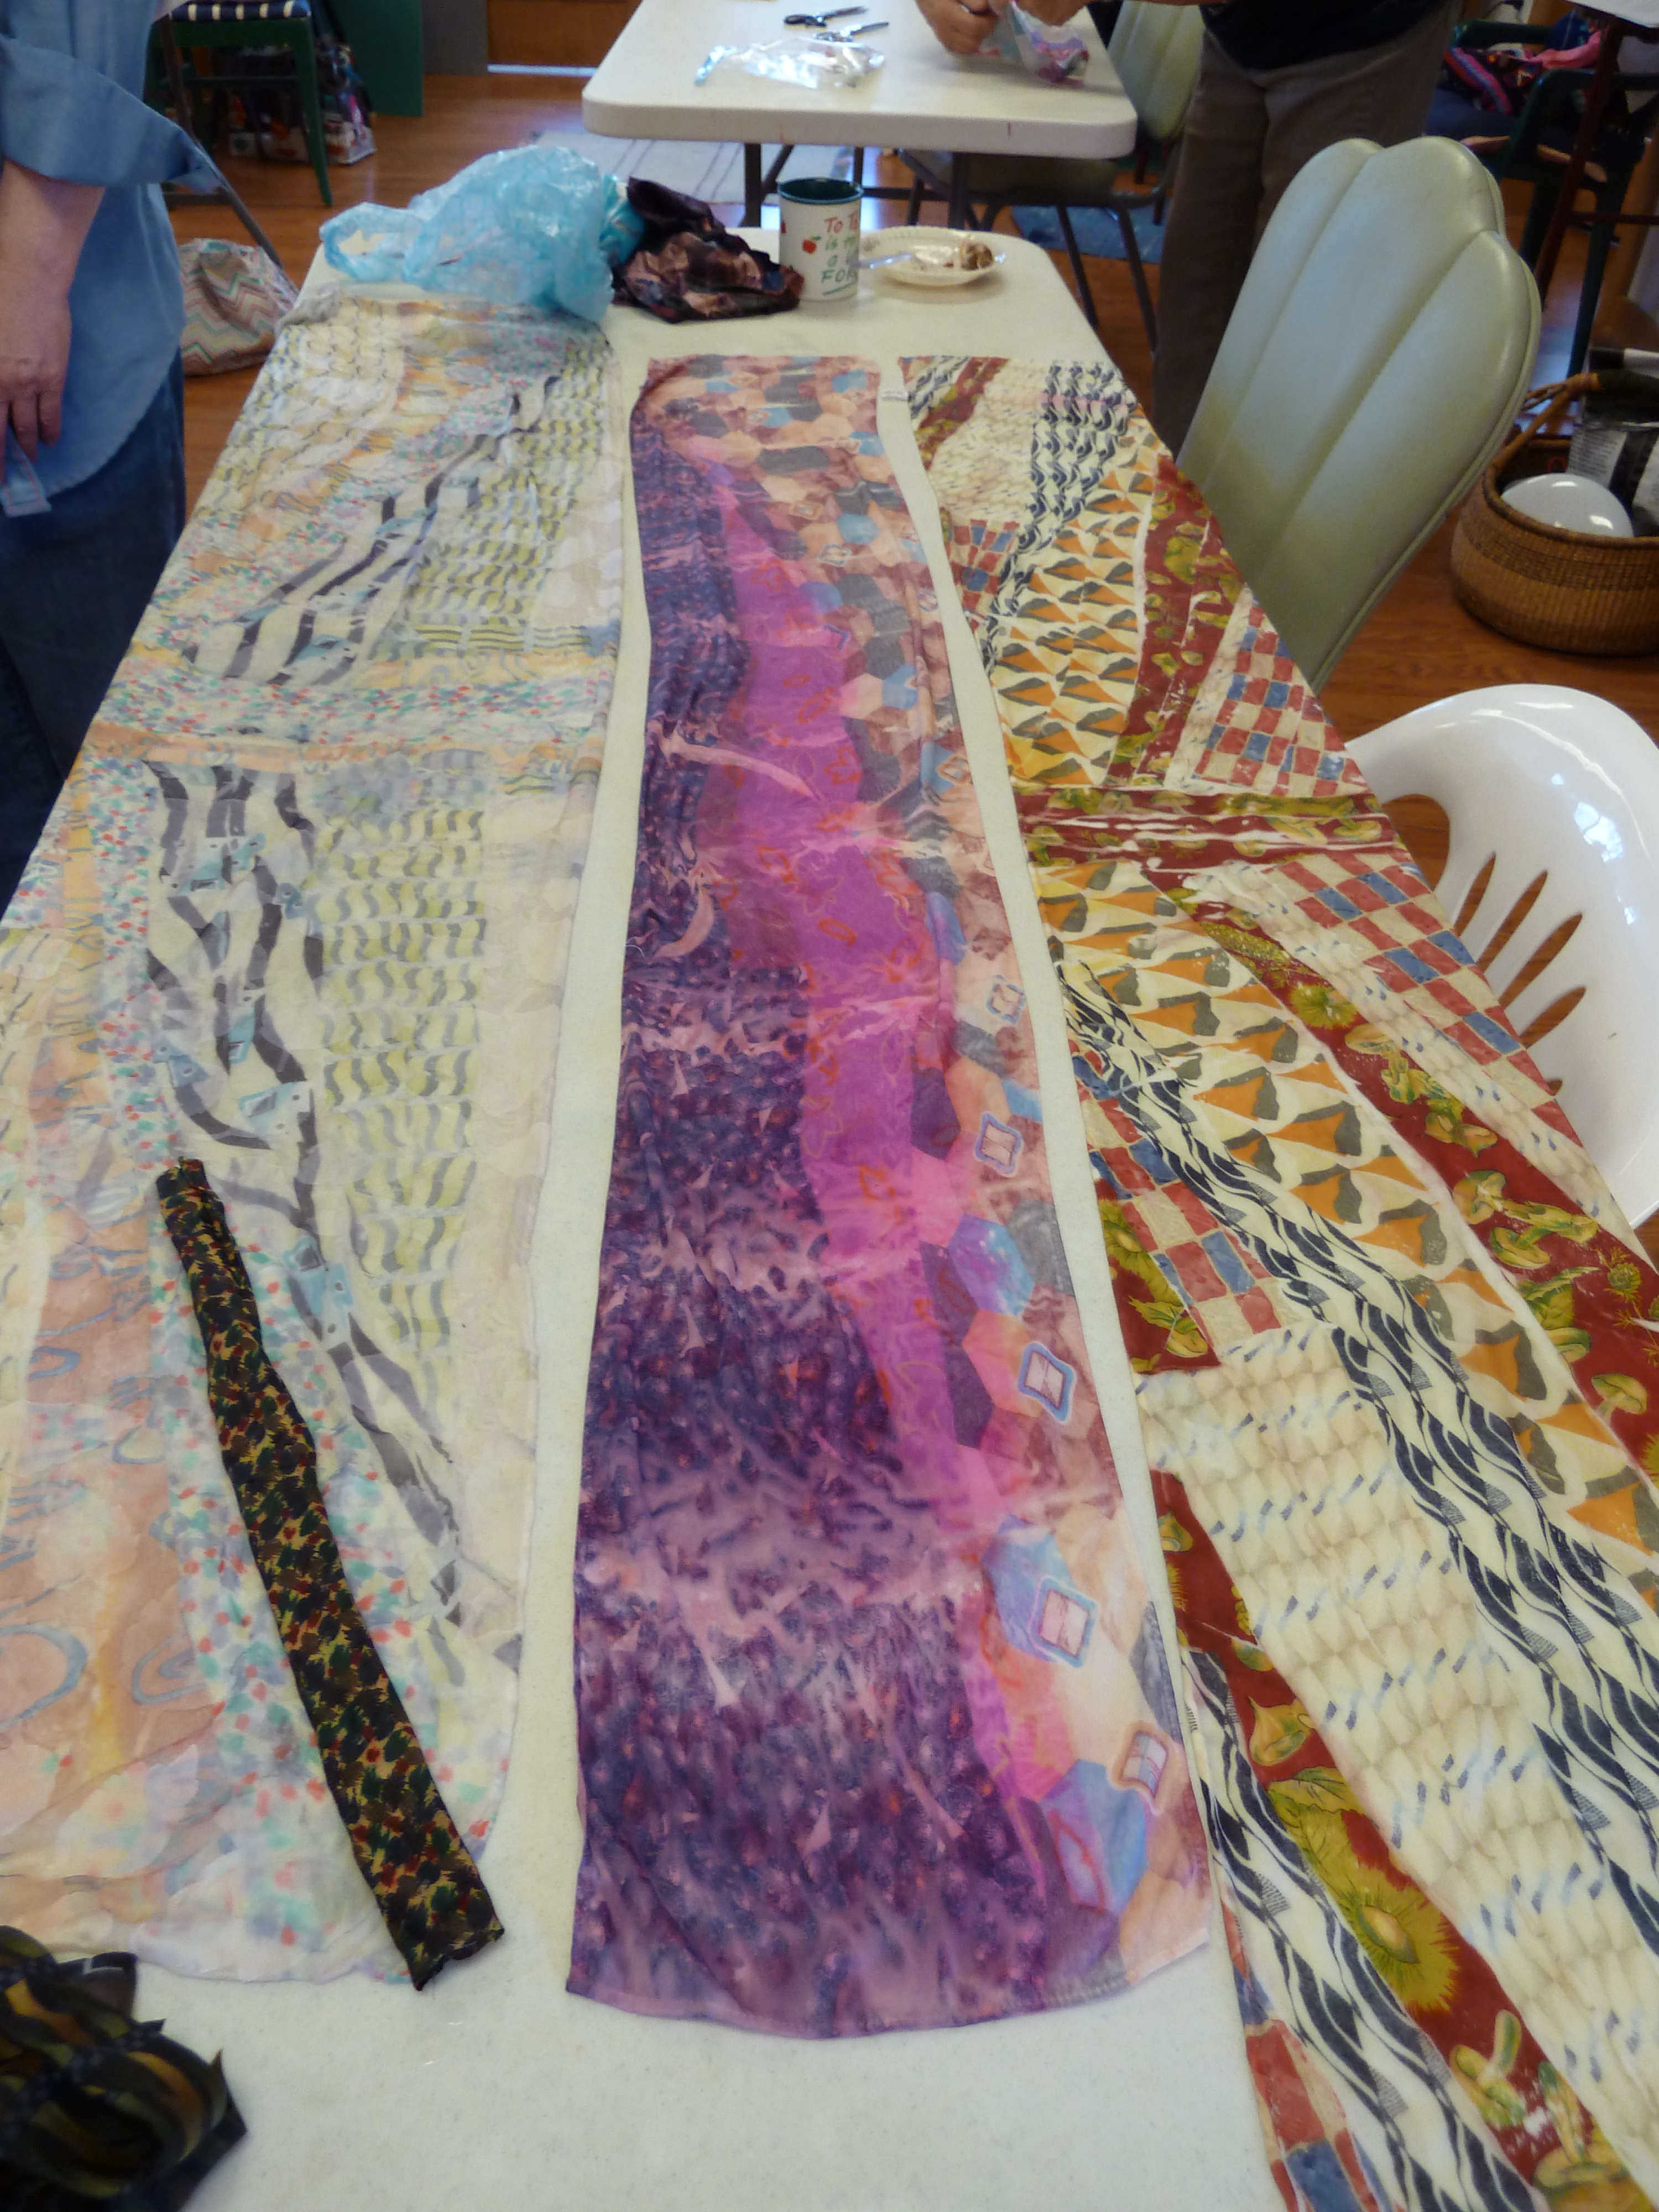
Here are a few of the sample pieces she brought to show us.  She uses silk yarns for the most part, and Lanaset acid dyes.  All of these were woven on a single painted warp (not combined warps); some have surface design elements which she teaches in another workshop called “The Esoteric Cloth”.

We each had two silk warps and accompanying skeins of weft yarn to dye, for 2 scarves.  The yarn was a 12/2 spun silk from Sanjo Silk at the Silk Weaving Studio on Granville Island, Vancouver BC.  She also gave us the color palette formulas for her basic range of 50 colors that she uses in her own work.  There were samples of the colors on large rings, which helped later in choosing a set of 5-6 colors to start the first painted warp.

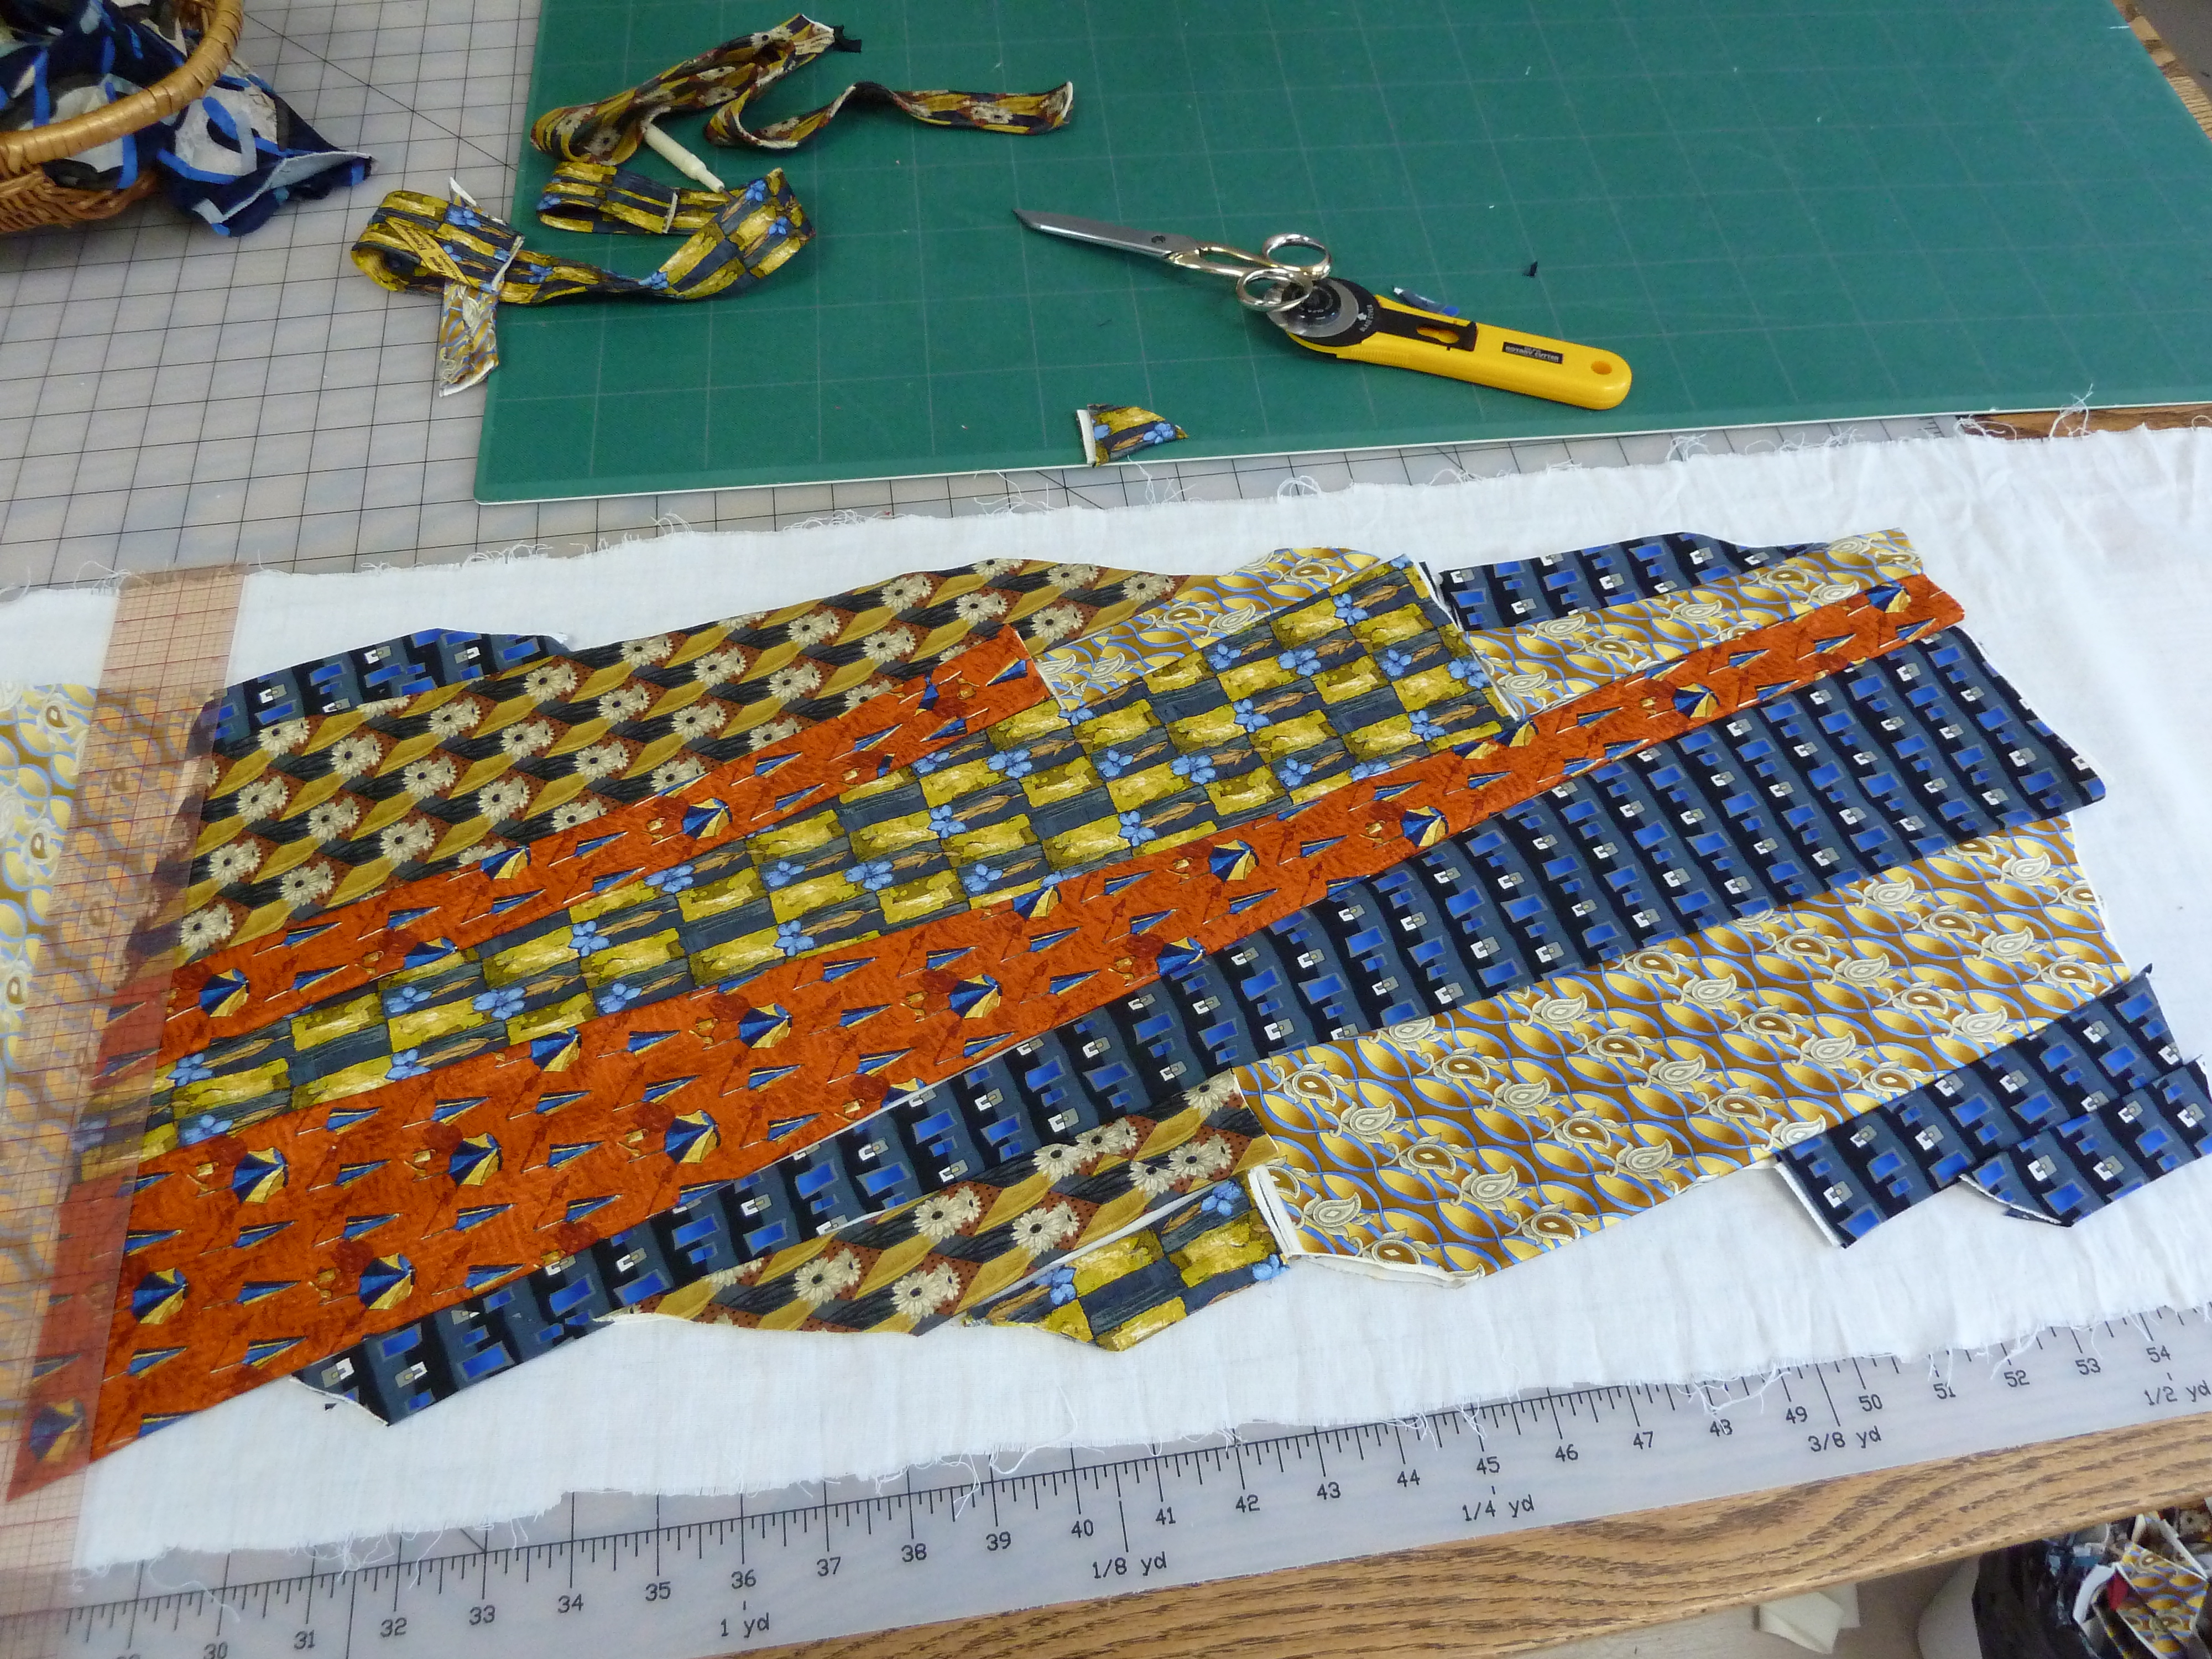
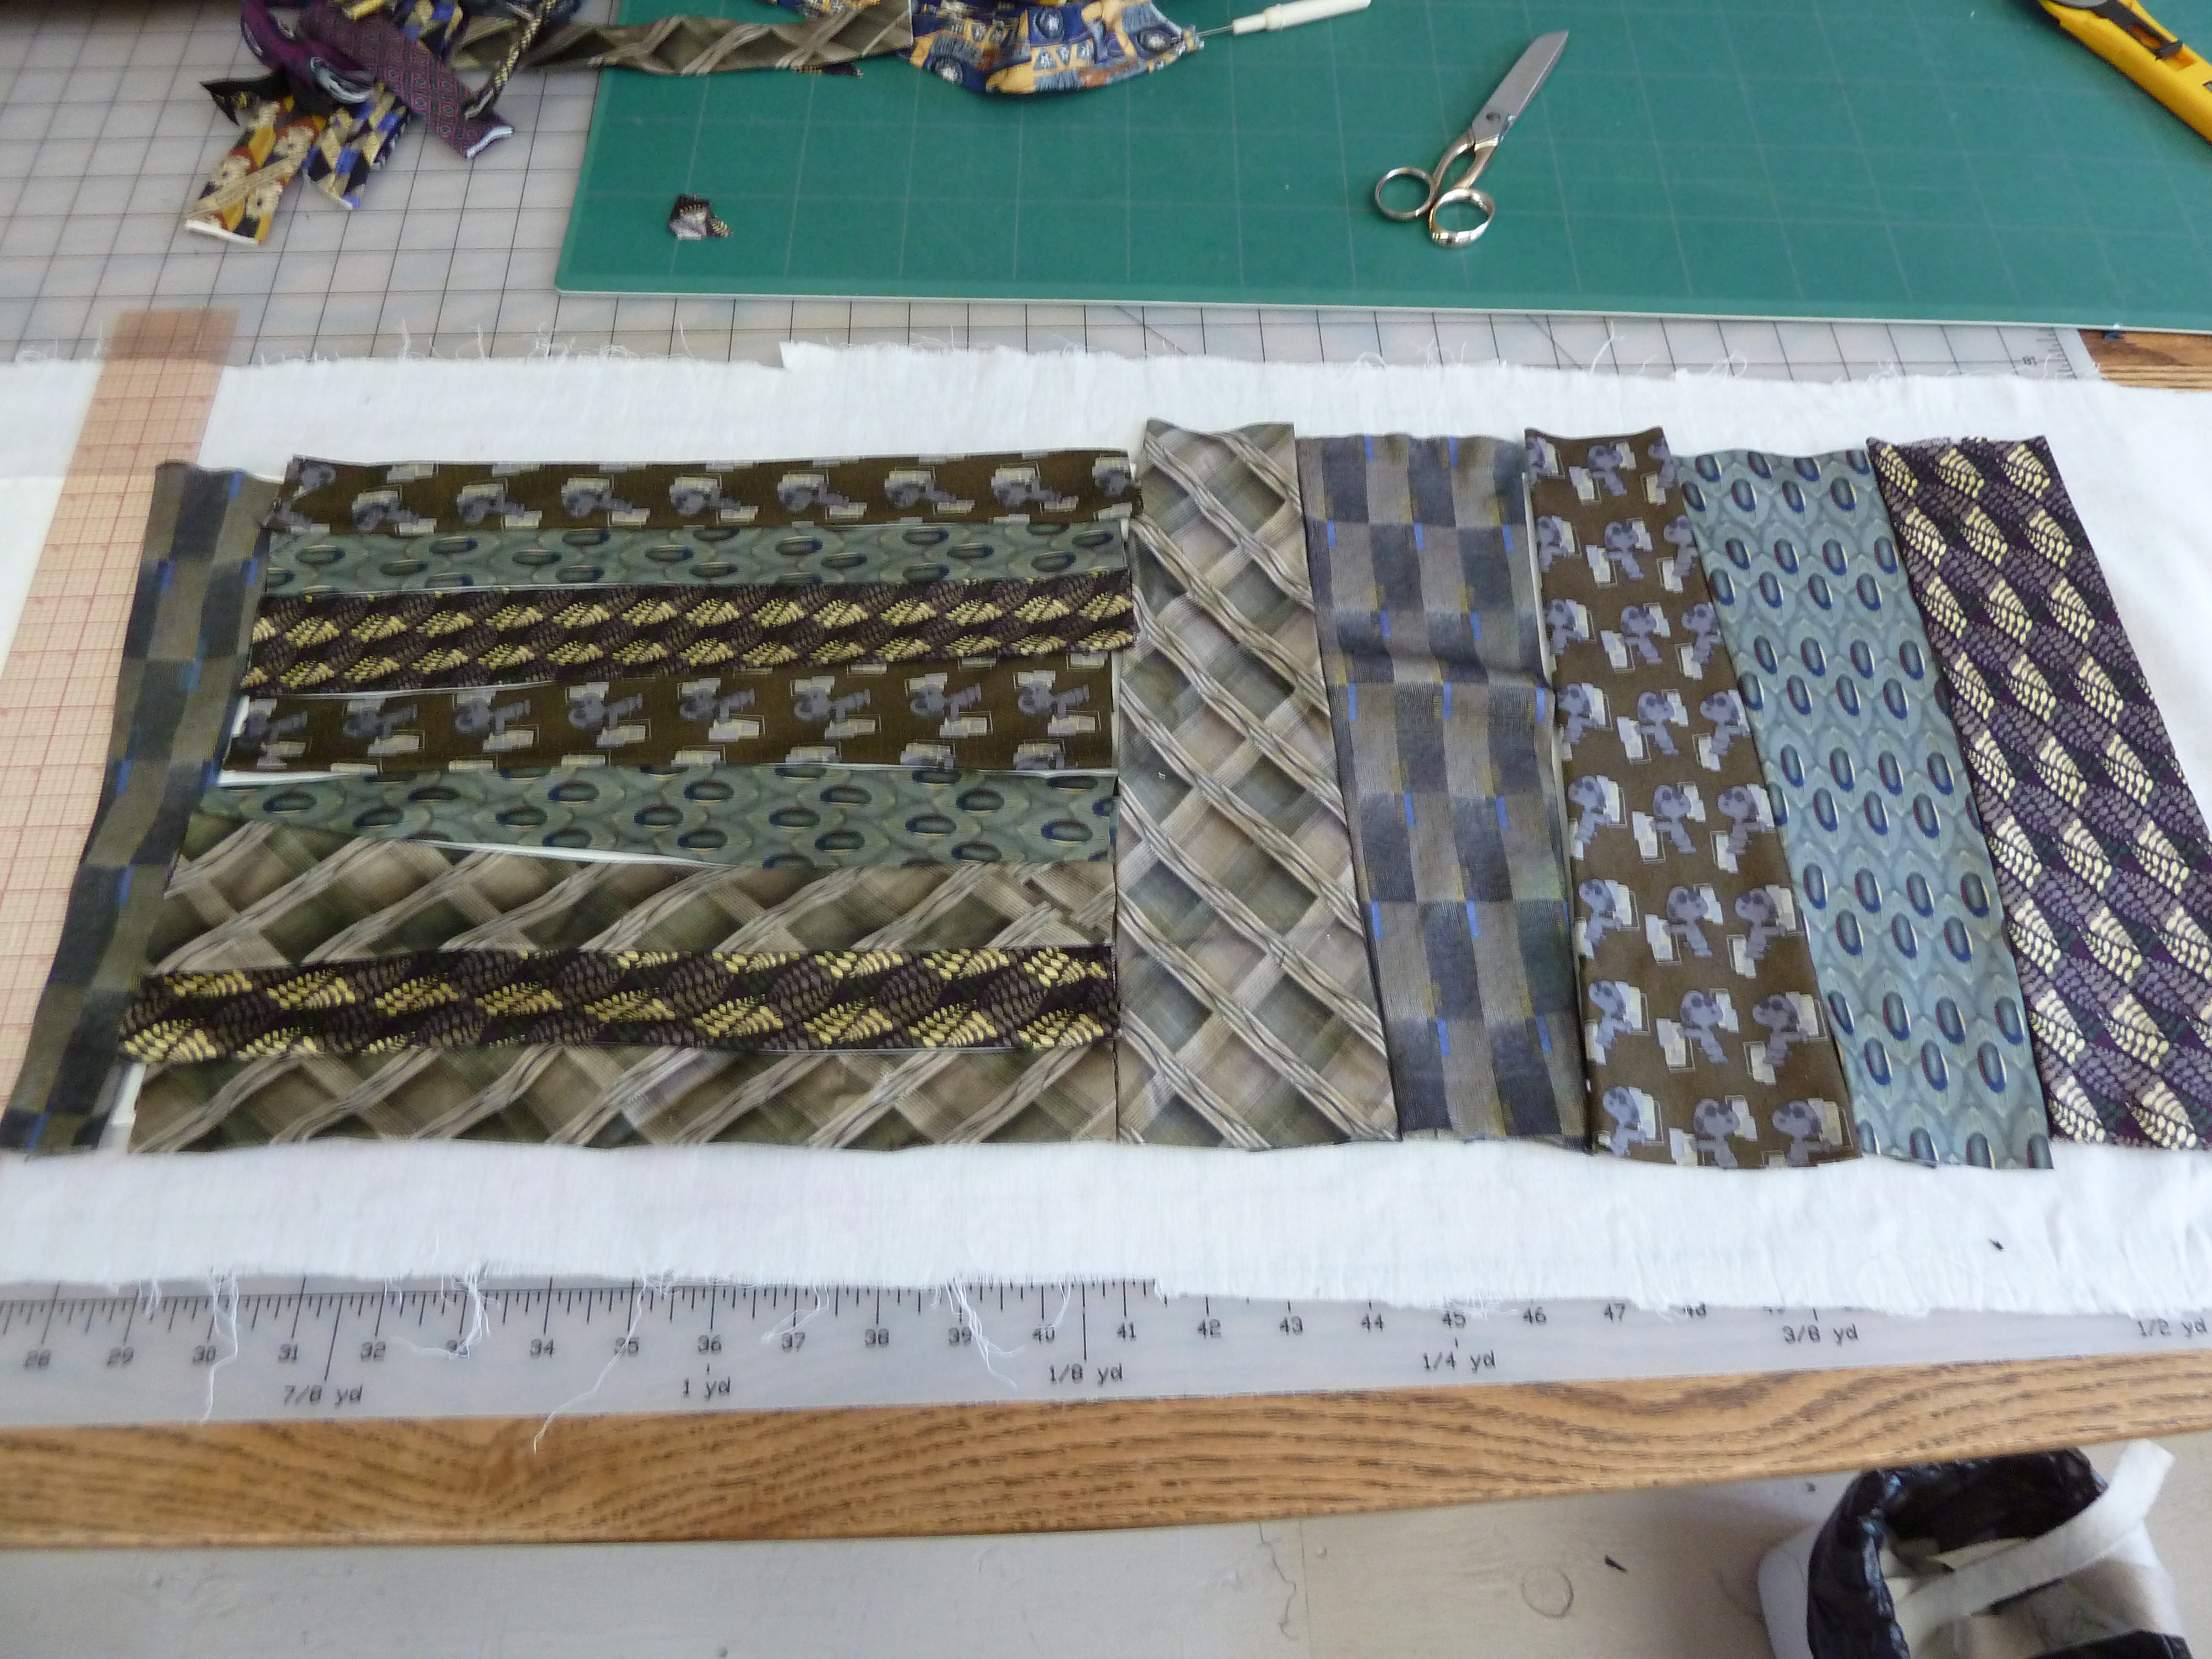
The first day was spent in discussion and then mixing colors to use for our first warp.  Then she showed us how to lay out the warp on plastic wrap and start painting.  It can be divided lengthwise into strips that are each painted differently.  By the time we actually got to work it was mid-afternoon and I couldn’t deal with the lengthwise strip idea, so I just “went for it” and painted a random pattern down the whole width of my warp.  I am not good at random usually, so this was a challenge!

Once painted, they were rolled up in the underlying plastic wrap, placed in a large ziploc bag, and steamed for 20-30 minutes.  There is no way to spread it out again once it is done, so I guess I won’t really know how this turned out until I put the warp on a loom and weave it!  We also painted the dye onto the skein of weft yarn, and steamed that.  My weft for this first warp is a dark navy blue.

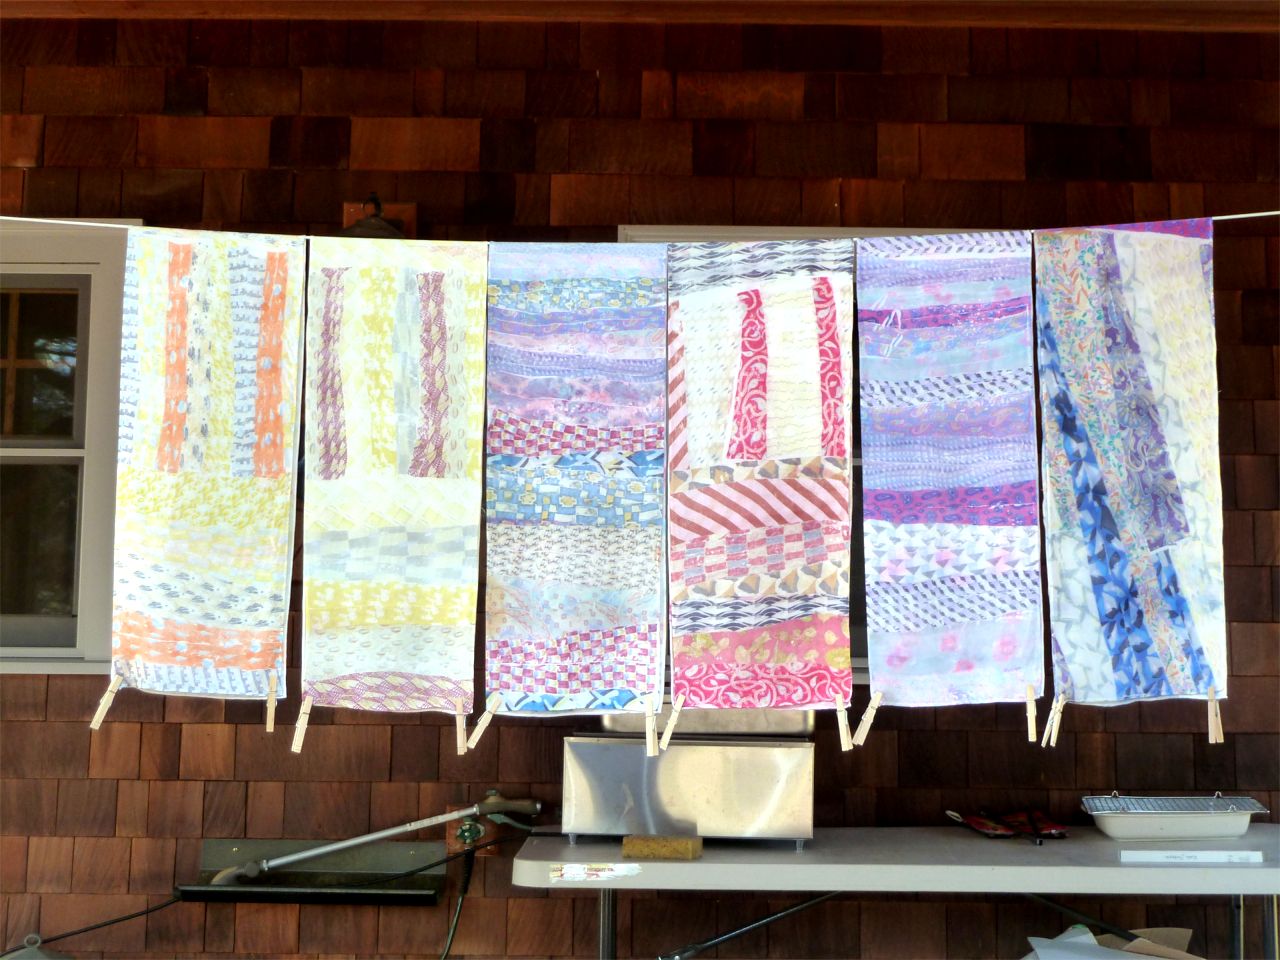
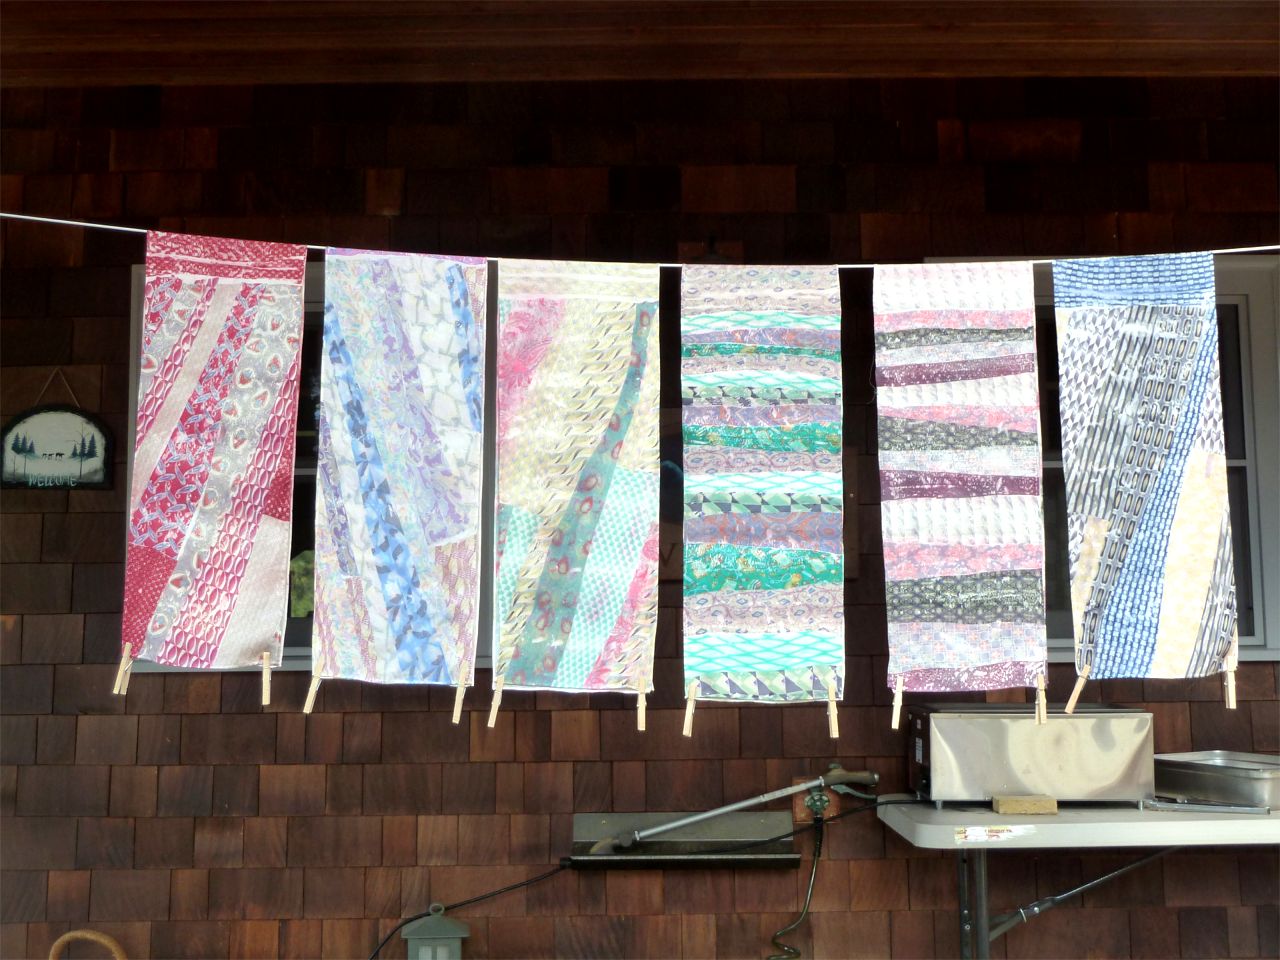
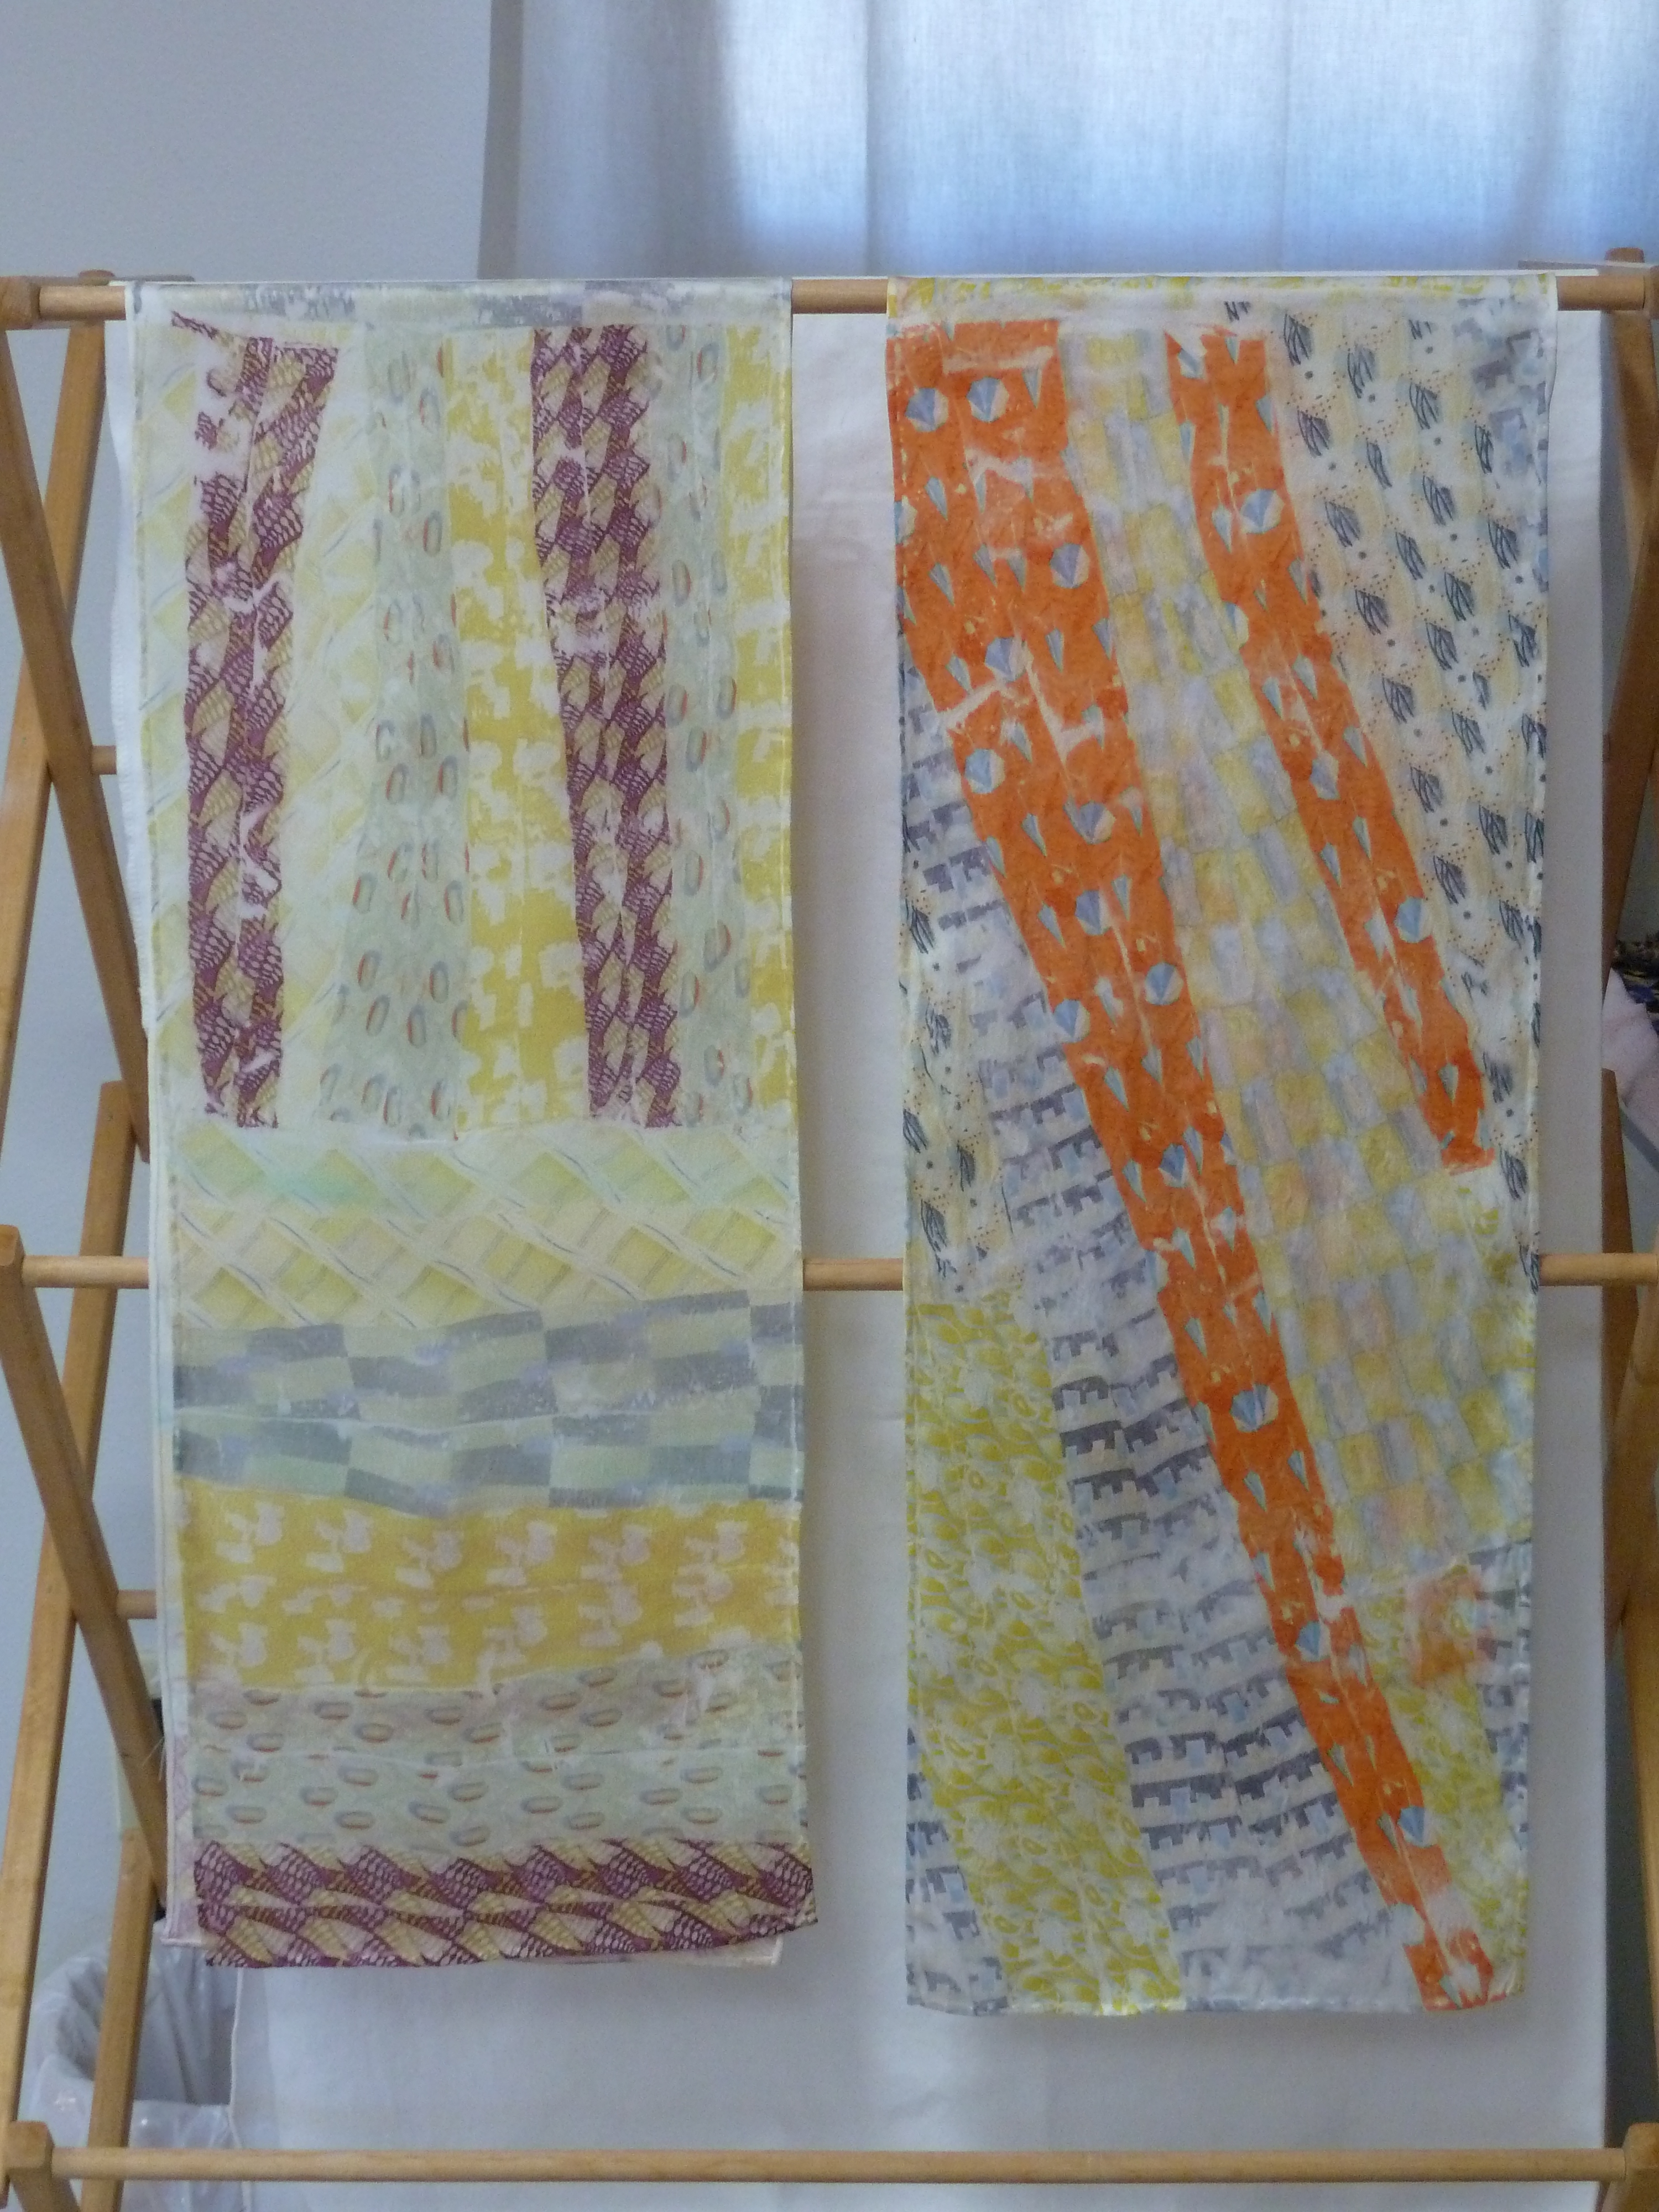
Here are the first day warps hung to dry outside:

The second day, she had us borrow other people’s colors from the day before, mix things up, just go for color without using formulas and planning.  Yikes!  But we also had more time, so I was able to divide my warp into lengthwise strips and paint each of them with the same colors, but offset.  I have a thinner blue-black border with shifted color down the middle.  The weft is a reddish purple.

Again, I won’t know how it all turns out until I weave it into a scarf.  But even if I am not completely happy with this first effort, it was about learning the process.  It was lots of fun, even if a little intense, and I do want to try some of this on my own.

Advertisement

Read Full Post »

Spinning Camp 2017

It’s been almost 3 weeks since I got back from another wonderful week on Orcas Island, immersed in spinning and dyeing with Judith MacKenzie and about 20 participants.  For the third year in a row, I have gone over with 2 friends from the valley.  Somehow we manage to squeeze our spinning wheels, tools, fiber, personal belongings and ourselves into my Honda CR-V and journey across the mountains and onto the ferry at Anacortes.  There you are, you know who you are!

The theme this year was “Colorful Ewe” and this meant exploring many ways to bring color into our spinning, with and without a dye pot.

On the first day we each chose a bag of “scrap fiber” that Judith had put together – bits of spinning fiber, both commercial and JM-dyed, mostly wool or wool/silk blends.  We were asked to spin a singles, using whichever method worked for the fiber prep, and changing colors fairly often.  Ideas of what to do with the singles:  (1) ply off multiple bobbins to even out the color and diameter, (2) spin to the left and then make a boucle onto a silk or rayon thread, then make a compound boucle in the opposite direction, (3) ply with a solid color.  I chose the latter and she had merino top in a variety of colors to work with for the solid.

My bag of “scrap” fiber

Finished the skein after returning home

On Day 2 she laid out a circle of dyed merino tops (see photo above) to show us a technique for making a marled yarn from 5 colors.  You hold 3 of the colors at a time across your hand and spin back and forth, from side to side, making sure to spin 2 colors together for a bit at each transition.  Then drop one of the colors and add in a new one at the other side.  You can make a 2-ply, and optionally overtwist the 2-ply to make a cabled yarn to get even more color mixing.  I have done this exercise in the past so skipped it (worsted spinning also not being my strong point…) but she did suggest lashing the 3 colors onto mini-combs to open up the fibers and make it easier to hold for spinning, if it is a struggle.

This day she also had us do an over-dyeing exercise to explore “The Harmony of Dominant Hue”.  We made pigtail bundles of a variety of commercial yarns (different colors and textures but all  protein fibers) that absolutely did not go together!  They set up mason jars with different dye colors to drop our bundles into for overdyeing.

JM’s samples – all were the same yarns

Project underway

A bonus of this exercise for me was the dye left in the mason jars.  I had brought some washed mohair locks that I wanted to dye in various colors and small quantities, to use in drumcarding wool batts for color and fiber accents.  So I got them soaking in a bucket and later that evening we dropped them into the jars and surrounding cookers.  I also did some later over in the “dye cabin” using up leftover dyepots, and by the end of the workshop I had a nice variety of colors.

Over the next couple of days, Judith also gave us lots of information and samples from lichen dyeing, and we compiled a little notebook with her notes, lichen samples and dyed yarn samples.  I didn’t get any pictures but it was very informative.

Another color exercise was making your own gradient yarn from a multicolor hand-dyed braid, instead of just spinning the color sequence the dyer had created.  She broke the braid up into color groups, from dark to light.

Then split the piles in half and spun 2 singles from dark to light.  When plied in the same order, the 2-ply is your own gradient created from the colors of a braid you loved for the color.

Here’s mine laid out and then the finished yarn.  I added a bit of solid colored merino to augment the color/shade sequence (especially the lemon yellow at the end).  This was fun and I can see doing it again with a full 4-oz or so braid (we only had about 1 oz to play with).

The other dye project I had in mind was to dye some fine 25-micron wool skeins (merino type) to use for weaving.  This we wound up doing in a steam table, and as usual I hovered and Judith worked her magic for me.  I wanted a “semi-solid” effect, i.e. not stripes of color across the skeins, and as it turned out we also got a gradient of color from skein to skein.  We were using Judith’s dyes (weak-acid super milling dyes for protein fibers) and we used lots of vinegar to make sure the colors struck fast and didn’t migrate around and make a mud pie in the dye bath.  She gently poked and lifted the skeins with a chopstick to make sure there were no “white spots” and that the dye worked its way down through all the fiber.

Pre-soaked and laid lengthwise and side-by-side in the steam table tray

Starting to add color at one side

Each one had a transition from the previous one and then went into a new color

My beautiful finished skeins!

It may be a while, but you will see these show up in scarves and/or shawls.


Save

Save

Save

Read Full Post »

Spinning Camp 2016

I spent last week on Orcas Island at “spinning camp” with Judith Mackenzie.  Like last year, I went with 2 friends from the Methow.  We somehow managed to get 3 spinning wheels and our personal luggage into my Honda CR-V, and did our grocery shopping up on the island (they give us one meal a day at lunchtime, but we are on our own for breakfast and dinner, and the cabins have kitchens).

3 Methow gals at camp

3 Methow gals at camp

Judith in the meeting room

Judith in the meeting room

The theme this year was “Let’s Spin It Right”.  Basically she gave us a lot of different kinds of fibers to spin and showed one or more ways to make the best use of it. Her new book is out and I would say a lot of things we tried drew on the book.  I did buy a copy as there is a lot of great info in there, not just about the various fibers.

“It’s time to look beyond wool, with The Practical Spinner’s Guide: Rare Luxury Fibers!  The go-to expert for fiber artists, Judith MacKenzie shares insights into working with uncommon (but readily available) luxury downs in this comprehensive, yet practical, guide for today’s spinners. With her natural voice for story telling that is both engaging and informative, she discusses the history of each of these downs, how they are used today, characteristics unique to each, and where to find them. She also dives deep into the specific spinning techniques for each fiber, knitting and weaving rare fibers, and dying them once spun.  From angora to bison, camel to cashmere, there’s a whole world of rare luxury fibers just waiting to be spun!”

The first day she gave us 2 oz. of 60% Polwarth/40% silk roving she had dyed.  I wound up buying a second one in a close but more blue color and over the course of the next day or two made this 2-ply yarn which I will use for a lace project:

JM's dyed roving spun into 2-ply

That day we also played around with spinning silk and ways to combine it with other fibers.  She had just received some beautiful darkish red eri silk from India.  She showed us a way she had just come up with to combine it with yak fiber.  The yak has quite a short fiber length and the silk is much longer, but she laid a light “frosting” on top of the yak and just added some in occasionally.  The final effect is a gilded yak singles that you can ply.  My sample is so small it isn’t worth photographing (and I need to practice to get it to look better!) but I was quite excited by this idea and intend to pursue it.

She gave us some washed camel undercoat which has all the lengths of fiber, the shorter of which are lost when it is made into top.  You can spin this directly, but she also combined it with silk on handcards, which requires cutting the longer silk fiber into shorter lengths.  I brought that project home with me as I am not that good with handcards and want to take my time.

They set up the dye cabin towards the end of the week and I did a fair amount of dyeing this year.  Several folks were interested in gradient dyeing of skeins of yarn.  This involves starting with a low water level, then gradually lowering the fiber into the bath as you add more water.

gradient dyeing 1

gradient dyeing 2

gradient dyeing 3

From home I had brought 8 oz of 60% Polwarth/40% silk roving and Judith helped me dye it in the steam table tray.  Basically I assisted and she did the colors!

roving dyeing 1

roving dyeing 2

roving dyeing 3

She has so many years experience she can just pour the dye stock solutions on and get wonderful results.  The challenge for me will be doing this on my own and not making a total mud pie out of it.  But look at my beautiful roving!

polwarth&silk roving dyed

I also did some immersion dyeing of 6 skeins of wool I bought at camp in 2007 from Island Fibers on Lopez Island.  Maxine always brings her wares (whole fleeces, dyed rovings, undyed rovings, etc) to camp.  They had sent Lopez-Island-raised Coopworth and Romney fleeces to be spun into yarn and after 8 years I had done nothing with it and it was still white.  Now with Judith’s help it is a lovely moss green and I have started swatching for a sweater.

It was another inspiring and informative camp with our lovely Judith, teacher and mentor extraordinaire.

Judith with Abstract Fiber

Read Full Post »

New Tie-Dye Silk Scarves

After we got back from Vancouver BC, I went to work on a new round of “Tie-Dye” silk scarves to get ready for the holiday season.  I pre-dyed 24 silk charmeuse scarf blanks about a month ago, so had a supply of different base colors.  I have gotten to like this better than using just a basic white scarf.

The frustrating thing about this is that I can’t always tell which neckties will transfer their dye well.  I will lay out a scarf, roll it up, put it in the vinegar water bath (6 at a time, actually) and then when I unroll it one or more colors may be just kind of anemic looking.  So I have taken to making a second scarf using just the necktie pieces that worked well the first time around, but adding in one or more new neckties and maybe doing some re-arranging of the layout.  This gives me two different but related scarves, and makes efficient use of the material.

In all of these pictures, the original scarf is on the right, and the second scarf is on the left.

Oct 2015 1

Oct 2015 2

Oct 2015 3

Oct 2015 4

Oct 2015 5

Oct 2015 6

Oct 2015 7

Oct 2015 8

Oct 2015 9

Oct 2015 10

Oct 2015 11

I got these done in time to take to an annual event I attend out in Port Townsend.  Whatever is left, I will disperse to the 3 galleries (Winthrop Gallery, Confluence Gallery, and D*Signs Gallery in Twisp).  I ordered more scarf blanks from Dharma Trading Co. and have plenty of silk neckties left, so I may do another round of these in early December.

Read Full Post »

Last week my back-door neighbor did a “tie dye” silk scarf day with her Friday bicycle group, and I went over to help out.  It was a lovely sunny day, and they were very nice women who were a little trepid about the whole thing.  The main concern was if they were choosing colors and arrangements that would work – we told them you couldn’t necessarily tell what colors were going to transfer anyway, so just go for it!  They all turned out well and of course I was so busy I didn’t take any pictures.

But it did inspire me to do some more myself, using the silk ties I had picked up over in the Skagit Valley when I went to visit my Dad, brother and sister-in-law a couple of weeks ago.  Some of these were from “second use” tie pieces, and although the scarves came out somewhat paler in color, I think it worked.

May 2015 set 1

May 2015 set 2

I have these for sale at the Winthrop Gallery in Winthrop (obviously) and down in Twisp at the new D*signs Gallery (that is how she spells it).  No website yet, but it is an added location for one of the partners in Methow Gallery at Twispworks, where she will do her graphic design and sign painting, in addition to running the new gallery space.  It’s really well done and a great addition to the arts scene in Twisp – you locals, go check it out.

This week I am pre-dyeing some scarf blanks a variety of colors, so will have some more on a colored background (instead of white) sometime in the next week or so.

After several days of chilly, cloudy weather, we are back to sun!  It is supposed to be in the low 70’s for the rest of the weekend at least.  Lots of flowers out now, and we hope to get back up in the hills while the arrowleaf balsomroot are still glorious, and the lupines are coming on.

This coming weekend brings ’49er Days in Winthrop and also the annual Sunflower Marathon and Relay sponsored by Methow Trails.  We will miss all that fun because we are headed over the mountains for Mother’s Day weekend and family visiting.  It should be a glorious trip over the North Cascades Highway, with snow still in the high peaks.

Read Full Post »

More Silk Scarves

A couple of weeks ago I followed up on our guild’s silk scarf project by doing 11 more at home.  I had purchased a dozen scarf blanks and had picked up a bunch of neckties already, so was ready to go.  I also wanted to experiment with a couple of things, like re-using the necktie material if it seemed like it still had enough color in it, and pre-dyeing the scarf blanks before doing the dye transfer part.  So it was a week of play in the studio, and a break from weaving!

This layout:

P1040564led to the scarf on the left below.  Notice that the scarf on the right has some white areas.  It turns out the trickiest part is rolling them up so that no wrinkles form in the scarf blank, as this leads to undyed areas.  I later fixed this scarf by putting it through the process again, laying pieces of necktie across the undyed areas only.  It added more visual interest, so all was well!

P1040582

The next was an experiment with woven, as opposed to printed, necktie material.  In our workshop, I learned that the woven ones don’t transfer their dyes as well, but I had already purchased some and was hoping to not completely sacrifice them to the waste bin.  The problem is that the dye is in the thread the material is woven from, instead of being printed on the surface of the tie.  Only one of these came through very strongly.

P1040566I later put this through again with some additional pieces that I knew would transfer dye, to make it more interesting. It is the scarf on the right.  The one on the left is the first one I did at our guild’s workshop.P1040581

This layout used some of the wide end pieces that have lining on the back (so that side won’t transfer dye).  I found that I could open up the narrow end and lay it on the back side of the wide end, thus getting printed fabric on both sides.  For these scarves, I pre-dyed the scarf blank a pale turquoise color first, so I didn’t have to completely cover the scarf blank with necktie material.

P1040571This led to the one on the left:

P1040576Another layout on a pre-dyed scarf with the wide end of neckties:

P1040573

which is the one on the left:P1040579

Loved this orange tie!  I think it has enough dye left to use at least one more time.

P1040583

It, and this one, led to the 2 scarves below.

P1040584

It’s interesting that the olive green tie above only came through as lemon yellow on the scarf.

P1040589Here are a couple more that I didn’t get layout pictures for.

P1040591

I have taken 10 of these up to the Winthrop Gallery.  I found a neat old broom display at the White Buck Trading Co. sale last weekend, and fitted it up for a scarf display.

P1040599

P1040600

Read Full Post »

Silk Tie Soiree

Yesterday was a really fun day at the guild room.  We have been planning to do a group project, which was to learn how to dye silk scarf blanks by transferring dye from recycled silk neckties.  We collected a bunch of neckties from various sources and ordered 11″ x 60″ silk charmeuse scarf blanks from Dharma Trading Co.  A couple of women from the Seattle Weavers’ Guild came over to visit and lead us through the process (there are also some YouTube videos out there that are pretty good).

Basically you lay out a piece of muslin bigger than your scarf (a couple of inches on each side), then lay the washed and ironed scarf on it, right side up.  It takes about 3 neckties worth to cover one end of the scarf in a pattern.   Don’t open up the ties, just remove the labels, as you want fabric on both sides – although you do need to remove the wide end as there isn’t fabric on both sides in that area.  Fold the other end of the scarf over, to sandwich the necktie pattern between the 2 ends.  Fold the muslin over, then roll the whole thing up and secure (but not too tightly) with cloth strips or string or something.  The roll is placed in a hot water bath with vinegar in it and kept just below boiling for about 2o minutes.  They tend to float so you have to come up with a way to keep them submerged!

Here we are starting our layouts:

P1040512

P1040513

P1040514

This was mine:

P1040515

and another  one:

P1040516

One very interesting thing was that the color of the necktie doesn’t necessarily predict how it will come out on the scarf!  Some just transfer their dye more completely.  Others transfer as a paler color, or a different color.  So there is a definite element of serendipity to this whole process.  But they all came out really cool.

P1040522

mine is the one on the right


P1040523

P1040526

I have more neckties and scarf blanks here at home, so will be doing more of these!

Read Full Post »

Orcas spinning camp

I spent last week up on Orcas Island at “spinning camp” with Judith MacKenzie – my 4th time at this event (I missed 2009).  This year’s theme was “Bringing Color into Your Spinning”.  They were set up to do a lot of dyeing outdoors (always a bit iffy in February in NW Washington).  Then it snowed.  And got really cold.  But our organizers managed to score an indoor space in an adjacent cabin to the meeting room, swathed it in tarps to protect the furnishings, and we pressed on!

The first day Judith entertained us with stories of her trip to Peru in November 2010.  She was one of the speakers at Tinkuy de Tejedores (A Gathering of Weavers) near Cusco.  She brought back some beautiful textiles, all nature dyed handspun and woven on primitive backstrap looms.  She also shared a portion of her collection of Peruvian “burial dolls” – many of them very, very old.  They are not really dolls, but religious or ceremonial objects.  The clothes they wear are made from fragments of cloth that were originally on mummies, so in some cases the textile fragments could be thousands of years old.

Judith with burial dolls

The first class project was to spin a boucle yarn using a rayon core and kid mohair locks that Judith had dyed.  I skipped this one, as I have tried it before, am really bad at it, and know I won’t be pursuing this one any time soon.

Next she had us spin up some Corriedale rovings in white and black (natural colors) and make a series of 3-ply yarns: 3 white plies, 1 white/2 black, 2 white/1 black, 3 black.  Then we overdyed the final skein(s) with a color of our choice to see how the color interacts with the underlying makeup of the yarn.  Or this would be a way to make a graduated color yarn as you transition from white to black.  Mine came out sort of “sea lettuce green”:

After they got the dye area set up, we were able to dye solid colors in big dye pots on the cabin front porch, or go inside where they had 4 electric roasters set up to dye variegated color rovings or yarn with a direct pour application.  Each of us were given 4 oz of Corriedale roving, chose a colorway, then Judith dyed it for us while we observed the technique.  After everyone had done one roving this way, we were able to do more on our own (with her help with the colors, “if needed” – ha ha, always needed…)

my first dyed roving

Another spinning exercise: we were given 4 oz of Corriedale roving that Judith had already dyed (variegated in color like the one above).  Then we were encouraged to “share and share alike” by getting small amounts of other colors from other folks in the room.  The idea was to introduce other colors into the spun singles, in either a random or semi-methodical way, to obtain a final plied yarn that is more complex in color than if you had spun up just the single colorway represented by your roving.  This was a lot of fun and I like the idea a lot.  I finished plying mine when I got back home but I don’t have a picture of the final yarn yet and here it is:

The basic roving was quite muted, cream through shades of greyish purple, but I introduced short sections from another roving from time to time: dark royal blue through purple, and a brighter turquoise color.  I spun all the singles, divided it into thirds by weight, and made a 3-ply yarn where all the colors just come and go randomly.  I am pleased with the result and will probably use this idea again.

I also spun up some Polwarth roving that I bought from Maxine of Island Fibers on Lopez Island, at the event.  I made about 150 yds of 3-ply and it is wonderful, springy and soft yarn.  I will definitely be spinning more of this fiber.  I dyed it in one of the roasters along with some merino/tencel roving I also bought from Maxine.  Can you say RED?

Here are two more batches of dyed merino/tencel roving:

The one on the left was supposed to have more purple tones in it, but as it turns out this was superwash merino and it takes up dye very quickly.  It all just sort of blended together.  But I can put it back in a dye bath at home and try to modify it some, and I will.

Read Full Post »

Painterly Dyeing

I finally got around to trying out a dye method I ran across last year in the magazine put out by Ashford Handicrafts Ltd in New Zealand (makers of Ashford spinning wheels, Ashford dyes, etc).  After randomly applying 2-3 colors of acid dyes to a long skein of wool using squeeze bottles, a roller is used to work the dyes into the fiber and create new colors where the dyes blend together.  Then the skein is microwaved or steamed as usual, to set the dye.

I had 17 skeins of 3-ply yarn that I spun up over the course of the last couple of months, using roving that was sent to me by my sister in California.  It came from a friend of hers who raises (or used to raise) sheep but she didn’t seem to know what breed they were.  It isn’t a fine wool, probably more like Romney, so I spun it woolen and then made a 3-ply for knitting.

So this is how I spent the last couple of days.  Jeez, it’s a lot of work just skeining everything, soaking, washing it out afterwards, etc.  But it was a learning experience!

First I re-skeined them into 4-yard skeins (to fit the length of a 6-foot work table) using my warping board:

After soaking them in a vinegar solution, I laid them out on the table and applied dye.  Of course this is the fun part, and also the most challenging part for me.  How do I come up with 3 colors that will play well with each other?  I used some of my dyed samples from last summer’s workshop as a guide, and also just played around with some mixes, trying them out on coffee filters.  I was trying to just have fun and be a little loose about it (not easy for me sometimes) but I did make notes – on the coffee filters!! – about what worked, and what didn’t work as well.

dye applied from squeeze bottles

dyes blended with the roller

The roller came from a paint store and is meant for use in wallpapering.  It has a little texture to the plastic surface, and I would like to find something smoother but still OK with water and dye.  But basically, it did the job.

After steaming, they had to be washed and rinsed, hung to dry – then I re-skeined them yet again into the standard 2-yard skeins that is my standard put-up for handspun.  I plan to sell these at the guild sale this weekend.  Hardly a “money maker” after spinning, plying, washing, and doing all this process to dye it – but I can’t use everything I produce and this was basically a learning experience for me.

They did turn out OK – some better than others – I got more subtle results when I diluted the 1% dyestock solution with equal parts to 3 times as much water.  Major lesson, that.

the finished skeins

I enjoyed this approach so much that I think I will try it on some finer yarns wound for a warp, and maybe some rovings for spinning.

Read Full Post »

Completely batty

I have so many ideas in my head about things I want to try, and/or a queue of projects I am trying to get to, that it sometimes almost seems like a random choice as far as what to dive into next.

However, I had so much fun dyeing those shawls a week ago – and Sara at Ashford Gallery in Winthrop keeps asking me for spinning fiber (you can tell fall is on its way – knitting and spinning are coming back into people’s minds around here) – that I decided the fiberarts project for this week was to dye up some fleece and drumcard some spinning/felting batts.

I used about 3 lbs of a white Romney fleece I bought last year from The Pines Farm in Maple Valley, WA.  The Schwiders raise white and natural colored Romney sheep, and Angora goats.  They are well-respected breeders and also chief organizers of the Shepherds’ Extravaganza held each April at the Puyallup Fairgrounds.  Judith MacKenzie McCuin recommended them to me for a fiber source.

I dyed 4 colors using Judith’s dyes (Mother MacKenzie’s) in various combinations of Blue, Magenta and Violet.  I used the dye samples from the workshop in Preston this past summer as a guide, and am happy to report that the colors came out quite similar even though it was fleece and not yarn.

3 colors destined to be carded together into layered batts:

3 colors all using Blue-Magenta-Violet

3 colors all using Blue-Magenta-Violet

The 4th color was a similar to the color on the right above, only a little more purple, so I used it by itself and then added a “frosting” of dyed kid mohair locks on the second pass:

4th color carded on first pass

4th color carded on first pass

after adding dyed kid mohair locks

after adding dyed kid mohair locks

I got eight 2-oz. batts from this color plus the kid mohair.

Here’s the drumcarder in action.  Love this tool!  It was built by Judith’s husband, Nick McCuin.

drumcarder in action

I failed to take pictures at some point.  This blogging is very demanding.  The 3 colors shown above were put on the carder in layers:  blueberry, most of the fuchsia color, then the violet, then a light frosting of the fuchsia again.  I got 16  batts, each 2-oz. of fiber.

After taking 10 batts up to the gallery this morning, I still have this nice box full of lovely batts, ready to spin or sell at the holiday sales coming up in November.  I know, I won’t get rich doing it- but every time I do a project like this I get more confident about what I am doing, and it is really a blast!

Box full of spinning batts

Box full of spinning batts

Read Full Post »

Older Posts »